A Headless Body Production
Venue: Maplewood Hobby
Event: LouCon: Round 3
Players: Phil Gardocki running Gauls
Tom Zimmerman running Warring States
Game System: L'Art de la Guerre, 15mm, 200 points per side.
The Forces: Warring States, China
1 Brilliant Commander and 2 Competents
4 Heavy Chariots, Impact, some or all Elite
4 Heavy or Medium Cavalry, Crossbow
3 Light Cavalry, 3 Bow
6 Heavy and Medium Sword, Polearm, Missile Support
2 Levy
4 Light Infantry, Bow
Breakpoint of 23
Gallic list 90
The Gauls are led by by the Asterix, the competent,
Obilix, the competent, and Bastardix, the unreliable, ordinary and
included. See here if you are interested...
12 Warriors, Heavy Sword, Impetuous
6 Warriors, Medium Sword, Impetuous
3 Light Foot, Bow
3 Light Foot, Javelin
3 Light Chariots, Javelin, Elite
2 Light Horse, Javelin
1 Levy, Mediocre
Breakpoint of 30
Display Conventions: When you see a word bubble like "Ouch!", "Autsch!" or "Ahi!", this implies a disorder from missiles. Letters in parenthesis represent some value change for the specific unit. For commanders it is s for strategist, b for Brilliant, c for Competent and o for Ordinary, u for unreliable. For troops it is e for Elite, and m for Mediocre. Other abbreviations, Hvy Heavy, XB Crossbow, LB, Longbow, Jav Javelin, 2HW 2 Handed Weapons, B Bow, Kn Knight, HKn Heavy Knight, HC Heavy Cavalry, Md Medium, Sgt Sergeants, LC Light Cavalry, Chr Chariot, Cat Cataphract, Pa Pavise, LI, Light Infantry, HG Hand Gun, FKn Foot Knight, Hvy Spear, Heavy Spearmen.
"XX" implies a unit killed in that location on that turn.
The weather is good.
Maplewood Hobby Specializes in many hobbies, including Historical Miniature Wargaming and Hobby Paints with hundreds of colors always in stock.
I know this picture is totally at odds with the topic. To help support the venue, I picked up a couple of Bandai models, and a tube of Testors plastic cement. The models are of the from the Star Blazers, 2199 series that has been available on blu-ray since 2020.
 |
| "Darold", a DBG.88 Bomber, and a Garmillas command ship. |
I am not kidding. The ships name is "Darold". Anyone that has read my AAR's know my default commanders are Larry, Darryl and Darryl. A fair bit of serendipity.
The model is of a Gelvades Class Astro Battlecarrier. Capacity of around 60 fighter craft, 24 beam weapons of 28 and 13 cm caliber. Along with numerous AA batteries.
Darold was destroyed by the Yamato during the battle of the Rainbow Star Cluster as chronicled in:
Original version, S01, E22, Battle of the Rainbow Star Cluster
2199 Remake, S01, E20, Under a Rainbow Sun
The original series was marvelous in the 70's and the remake is even better.
I had a heads up with the Space Battleship Yamato series, as I was in Japan when it was new there. Just about every other store front window had a poster of it on their windows. But it wasn't until I returned to the US in 1980, that I actually saw episodes of the Americanized version, "Star Blazers". I would rush home from radar school (ANSPG55B Mod 8) to watch the last 20 minutes of it in the barracks.
Back to our story...
Deployment:
 |
| Next to a river, the Chinese set up their infantry command. |
 |
| Their center command was their strike force of 4 Heavy Chariots. |
I recall Tom telling me the one LC had a bow, the other a crossbow. Until now I did not realize that was a clever bit of optimization. If shooting at an Medium Cavalry, then the bow is the primary shooter. Knights or armored foot, then the Crossbow is the primary.
 |
| On their left, a delaying or exploitation force of 5 troops of horse. |
 |
| Asterix takes the left command with 9 warbands. |
 |
| The line of Gauls runs on and on... |
 |
| Ending nearly to the other end of the field. |
The Gallic third command is no where in sight.
Turn 1: |
| Asterix hasn't had his magic elixir yet, and barely gets his forces moving. |
 |
| Obilix steps off smartly, and double marches his troops. |
 |
| The Chinese player decides to fort up in anticipation of a flank march. |
Turn 2:
No signs yet of Basdardix's command on the flank.
 |
| Asterix shifts left and advances to charge reach |
 |
| Even without Bastardix's forces, the Chinese are outnumbered. |
 |
| But can those numbers be put to good use. |
 |
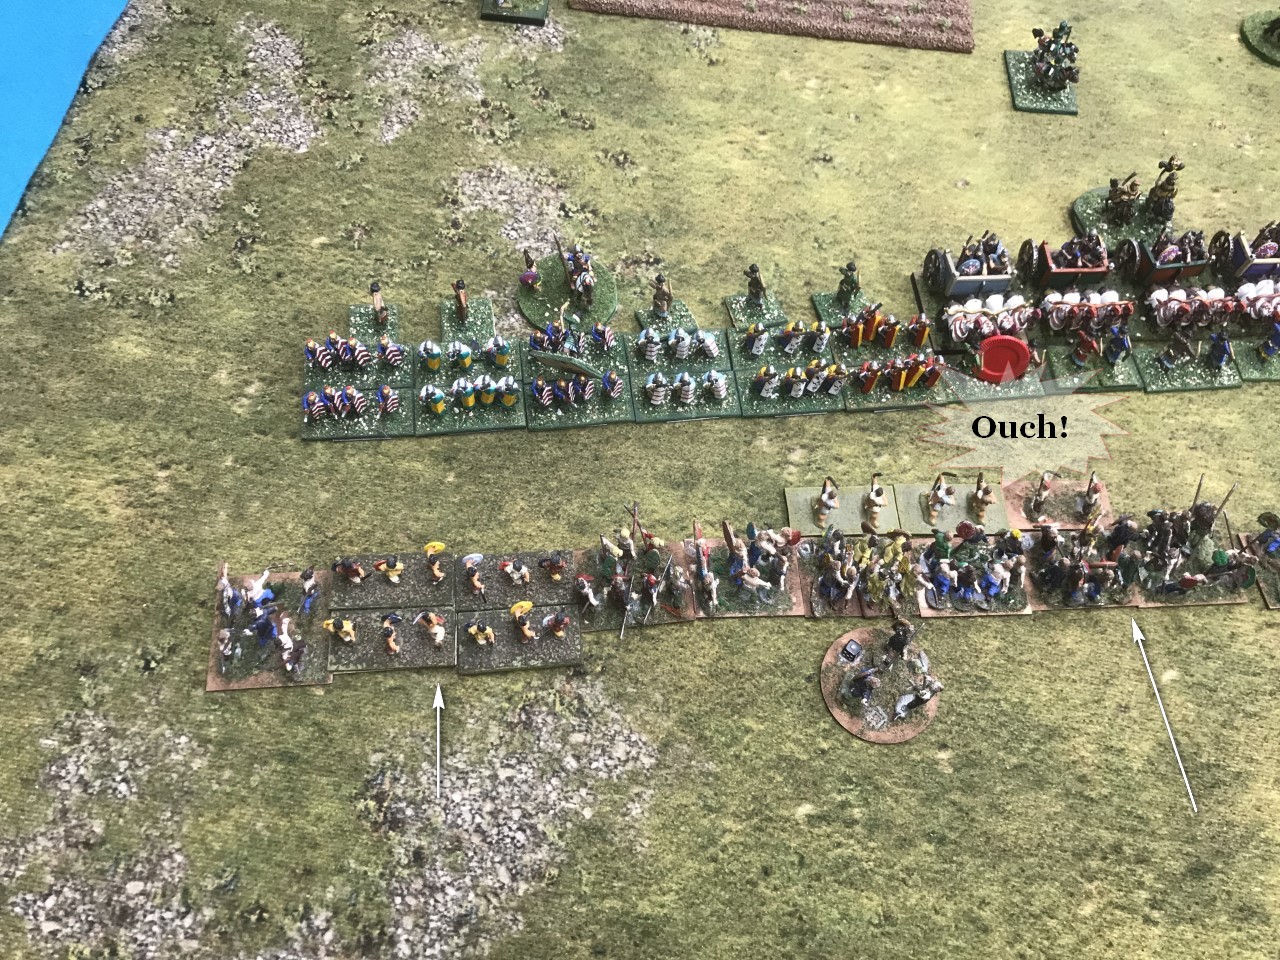
| The Chinese polearms men also shift, negating the flank advantage of the Gauls. |
 |
| In an uncharacteristic action, the Chinese skirmishers charge the Gallic skirmishers. |
 |
| With no hint of a flank march yet, the Chinese cavalry deploys to engage Obilix's foot on the hill. |
Turn 3:
No signs yet of Basdardix's command on the flank.
 |
| Asterix orders his charge. His tribesmen literally tripping over themselves to reach their foes. |
Even though I have played the Gauls in version 4, at least 5 times, I am still getting to know all the nuances of the impetuous rules. And got this one wrong as well.
The Polearms are still Swordsmen, and so cancel the Impact of the Impetuous troops. So down the line it is all straight up die rolls.
But I thought the Missile Support also canceled Furious Charge as well. And it does, but only for Mounted troops. But I still counted it as canceling my warriors Furious Charge as well.
So I cheated myself of the Furious Charge bonus here, and in a previous game.
Not that it mattered much. To get the Furious Charge, you must first actually win the battle, which the Gauls failed to do in 5 out of 6 contacts.
But here is a question for the group. Missile Support also provides a +1 if their force loses a battle. Does this still apply against Furious Charge? The similarly ruled Armor bonus does not. But Missile Support is not armor, so my opinion is that Missile Support does count.
 |
| Obilix also releases his warbands. With disastrous results. |
 |
| We both know the Chinese horse is not going to charge up the hill. So we might as well put pressure on them at the bottom. Just to keep them from maneuvering around. |
 |
| Asterix's forces have recovered some of their vigor. |
 |
| Well, Obilix was able to pin down most of the horse, but one is still free to run around and prevent a flank charge on the Heavy Chariots. |
 |
| While the rest of the horse takes advantage of their +2 to +1 initial charge bonus against Medium Sword before the Heavy Sword gets involved. |
Turn 4:
No signs yet of Basdardix's command on the flank.
 |
| The scrum continues. |
 |
| The Polearms men have done their job, as the Chariots are now looking for more victims. |
Not only did the Chariots destroy all their opponents, they did so without taking a single loss.
 |
| The fight at the base of the hill is developing. Obilix's Medium Swordsmen are cracking, but the Heavy Sword is now engaged. |
 |
| Obilix spends much of his command points to turn a warband to face the Chariots that will be on their flank. |
 |
| The Gauls have 19 points towards their demoralization level Without Bastardix's off board command that is 25. |
 |
| The battle on the right rages on. But 2 Chariots pull up and will seal the deal on Asterix's command |
 |
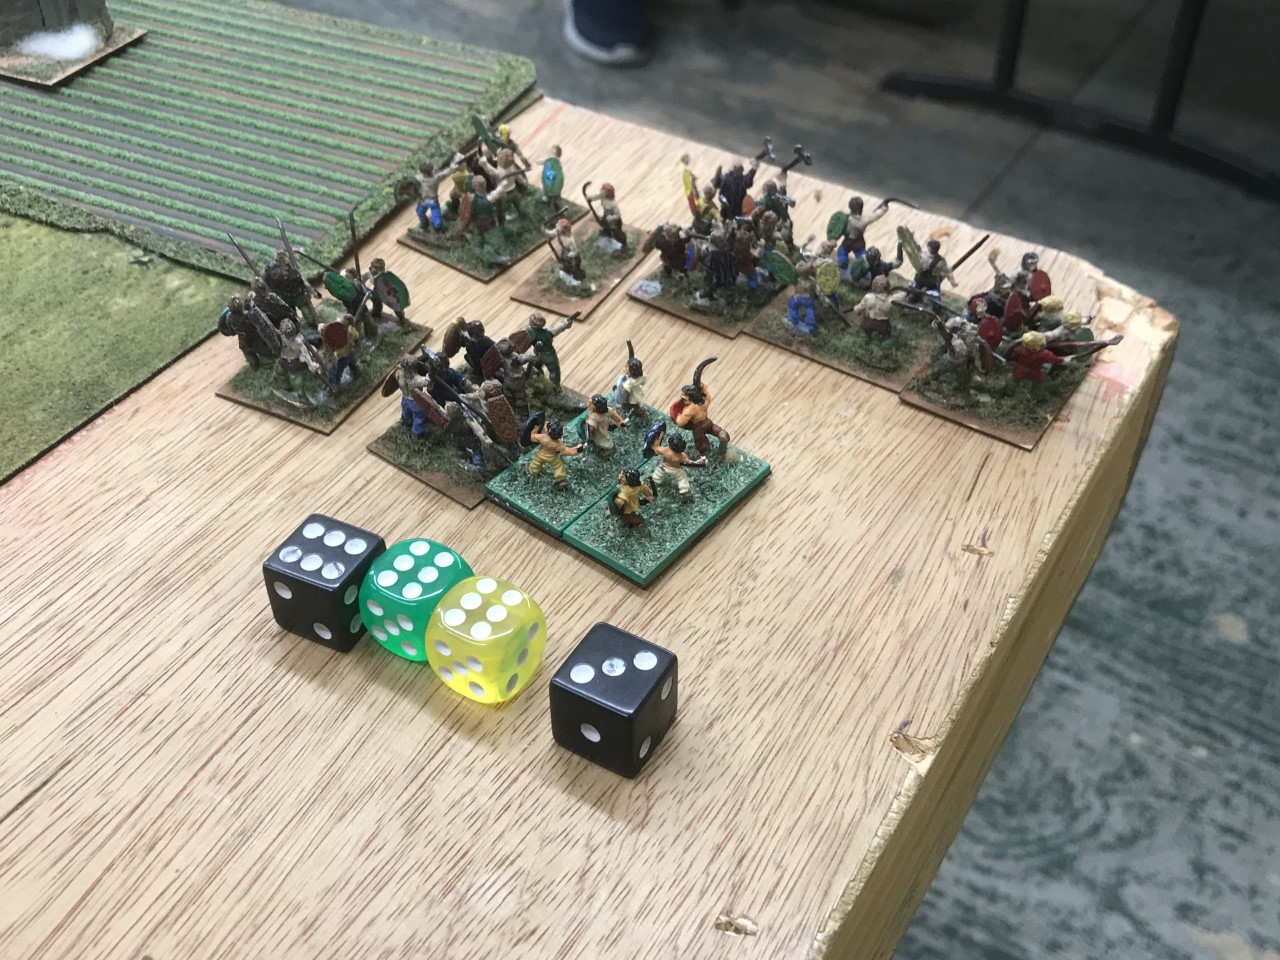
| The other two charge in on Obilix's command. |
But with an amazing piece of luck, look at the red chip. There is a warband fighting cavalry, flanked by chariots, and pulls a win.
 |
| The Warring States are at 16 towards their demoralization level of 23. |
 |
| The Guals are now at 21 of 25/30 |
 |
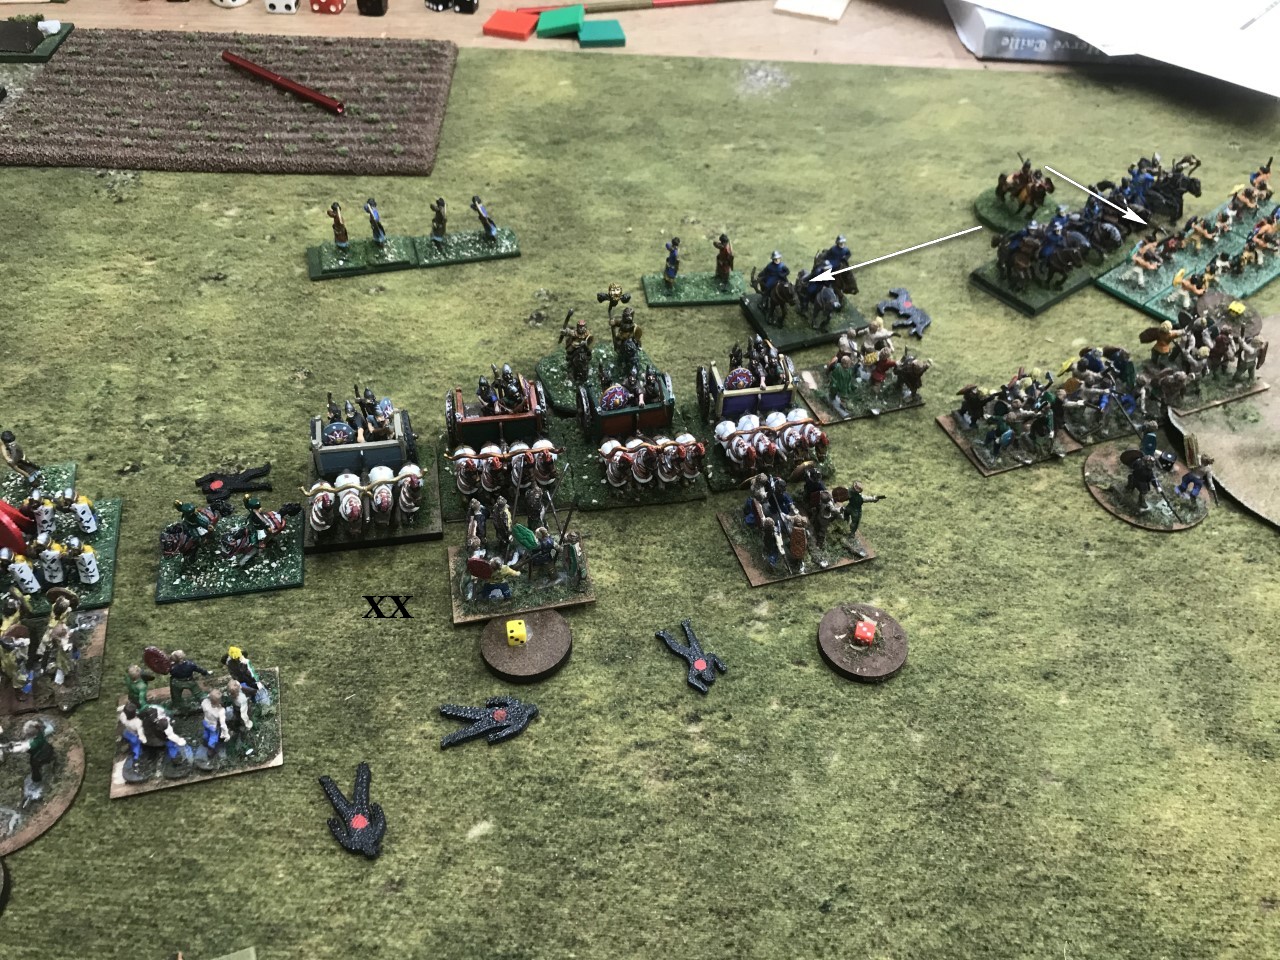
| Gallic warbands conform on their corner contacts. And roll poorly. |
 |
| Luck strikes twice. That warband fighting with a chariot on it's flank, wins, destroying its frontal cavalry unit. |
 |
| But the Gallic casualties are unsustainable. Without Bastardix's command, they are 1 away for being defeated. |
 |
| So, it's an out at any base. Two Polearmsmen defeats their warbands (+2). The chariots charge forward, rolling over another (+1 more). |
 |
| It's a narrow game, and the Chinese horse break off to avoid being destroyed. Meanwhile, their other chariots find another victim, taking the Gallic break point to 28 of 25. |
The game was closer than it looks, the Warring states were at 17 towards their breakpoint of 23.
What went wrong?
Obviously the flank march failing to come on was a problem. My decision to send it was mainly hubris. I did it earlier this tournament, and it arrived on turn 2, for the win. But also, I knew I was facing superior chariots and cavalry, and I sent it to protect it from being selected and run over.
The real cause for the loss was not having anything that can deal with Heavy Chariots, Impact, Elite. Hch, Impact, Elite vs Heavy Sword will win 91% of the time in 3.5 rounds. They crushed the front line for 8 points towards the Gallic demoralization, then turned the flank, gaining 4 more points. 12 - 0 for just the chariot command. The remaining Warring States commands also fared ok. The Pole arms also scored 10, losing 4. While the Warring States Cavalry command killed 4, losing 3.
Since I have Tom McMillen's permission to reprint, an ode to failed flank marches, Seti on the Flank.
A conversation about Missile Support. Anyone that brings up the issue has the opinion that Missile Support is over valued for the single point cost.
In today's example, we had impetuous foot charging pole arms with missile support. Polearms being swords, they canceled the impetuous impact, but not the furious charge. But also, if the polearm lost the initial battle by only 1, then the missile support kicks in for a +1, making it a tie. Mitigating the effects of furious charge by some amount.
My combat simulator has the following results of a 1,000 battles from contact to one side routing.
Heavy Sword Impetuous charging Heavy Sword, missile support will win 50% in around 4.2 rounds. Missile support was a factor in 419 battles, and Furious Charge in 286.
Without Missile Support, the Heavy Sword Impetuous will win 53%
in around 3.6 rounds.
Furious Charge is a factor in 421 battles. A surprising little difference.
Change this to Heavy Spear, Missile Support, which allows the impetuous swordsmen impact.
Heavy Sword Impetuous charging Heavy Spear, missile support will win 55% in around 3.8 rounds. Missile support was a factor in 587 battles, and Furious Charge in 406.
Without Missile Support, the Heavy Sword Impetuous will win 65% in around 3.2 rounds. Furious Charge is a factor in 581 battles.
For Heavy Cavalry, Impact vs Heavy Sword, the odds of the Cavalry winning are 28% if the foot has missile support, and 39% if it doesn't.
Compare this to the 2 point upgrade for armor. Armor applies to losing battles except against a furious charge, and has the added benefit of near missile invulnerability.
Heavy Sword Impetuous charging Heavy Sword, Armor will win 40%
in around 4.2 rounds, Armor providing a effective save in 1,450 bounds while Furious Charge in 404. Down from 50% against Missile Support.
For Heavy Sword, Impact vs Heavy Sword, Armor, the odds of the Cavalry winning are 30%. Furious charge a factor in 420 battles. Up from 28%.
So it seems like while Missile Support, at a cost of 1 point is nice, but Armor at 2 points is better.
So is Missile Support Overpowered? You decide.
Missile support is one of those things that works -really- well against a certain category of opponent (mounted with furious charge). When it comes into play, it's great.
ReplyDeleteOn the other hand, it also requires your units to receive the charge to work, which is a huge waste of points if your opponent doesn't cooperate and charge you.
That being said, I played one match just after v4 came out, Normans vs Berbers. I took something like 12 Elite Knights and my opponent maxed out on spearmen with missile support. Due to bad planning, poor pip rolls, and impetuous, guess who my knights ended up charging? I think ten of them were fighting supported spearmen, and four or five of the ten lost on the initial charge with only one winning. But... by the end of the game I had lost zero knights, and seven of the spearmen were dead. Elite and Armor is NICE.
Still, I always wondered why the rules authors don't consider just letting troops with missile support shoot instead.