A Headless Body Production
Venue: An Undisclosed Basement
Event: Playing a game for the camera
Players: Phil Gardocki running Korean
Dave Ray running Tang Chinese.
Game System: L'Art de la Guerre, 200 points per side
This game has it all, drama, character development, explosions, frequent bathroom breaks!
The Forces:
Tang Chinese (list 165)
Li Shimin, Brilliant, another Brilliant and Hsien-Pi, Competent
5 1/2 Heavy Spearmen 1/2 Bow
3 Light Horse, Bow
4 Nobles Heavy Cavalry, Impetuous
2 Nobles Heavy Cavalry, Impact, Elite
3 Heavy Cavalry, Bow
1 Medium Cavalry, Bow
2 Tribal Auxiliaries, Medium Sword, Impetuous
1 Light Infantry Bow
Breakpoint of 21
Koryo Korean (list 212)
The
Koreans are commanded by Kim-Lar-Re, the Competent, his brother
Kim-Dar-El, the Competent, and his other brother Kim-Dar-El, also
Competent.
2 Guardsmen, Heavy Cavalry Impact, Elite
2 Horsemen, Heavy Cavalry Impact, Ordinary
2 Militia Horsemen, Medium Cavalry Impact, Mediocre.
6 Spearmen, 1/2 Heavy Spearmen, 1/2 Crossbow
1 Cataphract, Elite
2 Light Cavalry, Bow
2 War Wagons, Crossbow
1 Light Infantry, Bow
1 Hwacha, Heavy Artillery.
1 Guardsmen, Crossbow, Pavise, Elite
Breakpoint of 21
The
Hwacha artillery is a multiple barrel launcher, where each piece is a
rocket propelled arrow, and some explosive material. Up to 200 rockets
could be fired in a few seconds. Think of it as throwing 200 Rocket Propelled Grenades down range in about 10 seconds. Mythbusters made and tested one on their show.
The Board:
The Tang win the initiative and elect to attack in the plains.
Near the town of Jinshan, on the Yalu river, the Tang invaders are met.
The Tang are at the top.
 |
| Since I am really bad with eyeballing the sizes, I started posting the commands from right to left, putting down the War Wagons first. |
Which is probably why the Tang Horse command near the river was deployed sideways. He probably had thoughts of charging over the hill and dispersing all in front of him. But instead was looking at artillery and war wagons.
Turn 1:
 |
| Li Shimin boldly swings towards the Korean line from the right. His counterpart on the left did not like the matchup and started shifting to the center. |
 |
| Kim-Lar-Re sees an opportunity to take the hill with his fast moving cavalry. Unfortunately, his talents were not up to his dreams and he only got part way. |
1 more command point would have put the lights on the hill. 2 more would have gotten the heavy horse to the base of it.
Turn 2:
 |
| The Tang continue to push on their right. Revealing an ambush in the plantation, while the other ambush reveals it self by firing their crossbows at the advancing cavalry. |
Hsien-Pi, realizes vacating the hill was a mistake but is driving impetuous cavalry, which are "Unmaneuverable" in the game. His only response available is to send his lights back to intercept.
But the infantry commander has this well in hand. His missile troops project their power well across the board and tag one of the Korean Light Horse.
 |
| Kim-Lar-Re realizes his heavies are not going to make it to the hill and would lose a fight against bow armed heavy spearmen, and he with draws. The Cataphracts charge the only light horse mid field, driving it away. |
Turn 3:
 |
| On the Tang right, they focus their horse bow upon the Korean spearmen in the plantation, but withdraw their lancers for now. No need to give the rest of the Korean shooters extra targets to shoot at. |
On the hill, the Korean Light Horse are trapped against the river. They cannot withdraw to their lines as the path is blocked by the War-Wagon.
Off in the distance there is the sound like many hives of bees. The Hwacha have sent thousands of exploding arrows down range, disording one of the Tang infantry commands.
I know I am using "Boom!" to reference shooting the artillery, but portraying its firing as "Swish,Swish,Swish,Swish" would be annoying and take up too much landscape on the picture.
 |
| The Korean Cavalry reforms their ranks, nearly where they started. Their Guards Crossbow advance to support the a War Wagon. |
As an indicator, when you see "Ouch!" or "Crash!", that implies a missile hit.
Turn 4:
 |
| Not much changes this turn. Light on Light fights on the hill. The Koreans plan to sell their lives dearly and hold back their Tang counterparts. |
 |
| On the left, the Koreans bring up more shooters. In the center, the heavy horse threatens the Tang center. On the right, one Korean light horse sees a chance to make a break for it and does, leaving his compatriots behind. |
The score is 3 out of 21 for the Tang and 5 out of 21 for the Koreans.
Turn 5:
 |
| An ambush is revealed, Tribal foot soldiers desperate for a fight. The Hwacha scores again, but his target has been steadily rallied over time. On the hill, the desperate Koreans redouble their efforts, and push back their attackers! |
So what's up with the Cataphracts? Largely command control problems. They belong to the infantry command, and he has been too busy to give them the 2 command points to get them to turn around an vacate. So they have been sucking up missile fire like a shield of missile attraction. Which with a protection of +2 and elite, they do a good job of. I could charge them, but they would lose and die sooner. Pretty heartless to just keep them there though.
 |
| In the center, Kim-Lar-Re pulls another not-well-thought-through operation. Heading for the gap between the heavy spear and the field. He takes the pressure off of the Cataphracts but the rest of the cavalry command withdraws out of bow reach. |
On the hill, the Korean Lights disperse one of their attackers!
Turn 6:
 |
| Seeing a dangling flank, the Tang lancers commit to the field, supported by their foot tribesmen. This was a trap, as I plan on sending more foot spear into their path, while "ZOC'ing" their bow armed horse. The fight on the hill is decided, and the other Tang Cavalry command pushes their horse forward. |
 |
| On the left, the trap is sprung. The Tang Heavy horse is both disordered and ZOC'ed by Heavy Spearmen. The Korean Cavalry, ever mercurial, withdraws again from the fight. However two of their lancers are now being deployed as a counter punch to the Chinese Tribesmen when they charge. |
FYI: The (5) next to the one Tang foot unit represents the number of times the Hwacha has hit it. It's general's success rate at rallying it is quite good.
Turn 7:
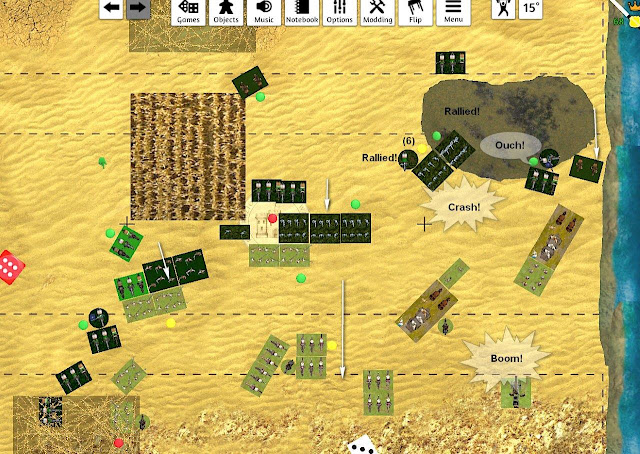 |
| Clashes and Crashes across the field! Tribesmen press the Korean Spearmen. But in the center, Korean Spearmen are pressing their Tang counterparts. |
There is a mistake in the direction arrows. The Korean Cavalry moved last turn. They are "Impact" and cannot evade.
The score is 10 out of 21 for the Tang and 10 out of 21 for the Koreans
 |
| After all the maneuvering the Korean Heavy Cavalry get into the action. Rolling back the Tribesmen. In the center, Chinese Heavy horse threaten the Korean spearmen, but have already picked up a disordering hit. The remaining Tang Spearmen cannot really support the attack as they are faced by Korean Lancers, and being shot by a War Wagon. |
The score is 16 out of 21 for the Tang and 6 out of 21 for the Koreans
We had been at it for 5 hours at this point and Dave surrendered. While there was plenty of life left in the Tang army, there was no place where he had the advantage. The Cavalry around the plantation was losing their missile exchange, his impetuous foot was disordered, and facing fresh foes. His Impetuous cavalry was facing Heavy spearmen, and would be charging in at unfavorable odds. His remaining spearmen were mainly disordered facing fresh shooters.
So what went wrong?
Poor inter unit cooperation. My lights charged for position, and my war wagons shut the door behind them. The Cataphracts charged, and only ran off a light horse for their troubles. Then spent their rest of their miserable existence as a pin cushion. The cavalry was indecisive until the end, and even then was mostly just pinning the enemy down.
I like having the cataphract with the foot troops. It gives them a bit of flexibility, and hitting power, while protecting it from being preyed on by knights. But I have to keep it in tight, as the commanders are all just competent, and don't have the 2 command points to spend on anything fancy.
The War Wagons performed well, and so did the Hwacha.
I was complaining a lot about my opponents incessant rallying. But I really should have took that as a win. The Hwacha scored 6 hits on his target, and it would have died, instead it ended the game with just 2 hits. A waste of the artillery? No. Once deployed, that shooting and hitting cost me nothing in the game, while the rally efforts cost a precious resource, command points. That is points needed to drive other units. So it was a win, a frustrating win, but a win.
I should remind my self that missile fire cannot be expected to destroy a unit. But just prepare it for hand to hand combat to take it out. So effective missile fire in itself, is a losing game. You have to be able to "close the deal".


