Saturday, June 25, 2016

Abbasid Arabs vs Anglo Irish.

A Headless Body Production

Location:   97 Sunfield Ave, Edison NJ, 08837
Event:        NJ Con's Fire in the East
Players:     Phil Gardocki,  playing the Anglo Irish
                   Joe DiCamillo, playing Abbasid Arab
Game System: L'Art de la Guerre, 200 points per side.


It's the second round of a L'Art de la Guerre tournament at NJ Con's Fire in the East convention.  The first round went well, and after a great, no, good, no, mediocre lunch.  I was eager to start again.  Despite winning the first round I am thinking it is more a fluke than anything else.  Since winners are pitted against winners, in theory, I would be playing the one of the best players in the tournament.  Joe DiCamillo did finish 2nd for the day, so I was right.

The Forces:   
Abbasid Arab: (there is some guesswork here)
       4 Light Foot Bow
       6 Cavalry, various qualities
       8 Light Horse, some Impact, some Bow.
       2 Heavy Cavalry Impact
       6 Medium Foot "Mixed" units. 

Anglo Irish: Commanders  Larry, Darryl, and Darryl.
       6 Longbowmen (two elite)
       2 Kerns, Light Infantry  Javelin
       4 Galloglaich, Heavy Infantry 2H Sword (all elite)
       2 Light Cavalry, Javelin
       2 Irish Foot, Javelinmen
       2 Anglo Medium Knights, Impact (both elite)
       2 Irish Nobles, Heavy Cavalry
       5 Fortifications


A note on the organization of the Anglo-Irish Battles. Battles was the term applied to commands in Medieval times.  The main Battle, lead by Larry, who is a competent general, has 8 units in it. The 4 Galloglaichs (Gaelic for Young Foreigners) and 4 longbow. 

The other two battles, each lead by Darryl, also a competent general, contain a Longbow, a Kern, a Light Horse, a Javelinmen, a Knight and a Heavy Cavalry. 6 units, all very different. The thought here is no matter what the terrain is, there is a something here that can deal with it. Not enough force to win, but with proper team work enough to avoid losing. I am regarding these Battles as "Utilitarian".   Though, Walt Leech has now christened them "The Swiss Army Knife" command.

Hopefully it will confuse my opponent long enough to bring the first Battle into the fight to win the game.

The Board:
The Irish lost the initiative and the Abbasid decided to attack them in the plains.  The Irish were required to take a field, and selected 2 plantations, a hill, and the road.  My opponent took a gully and field.  His field was in the center of his muster zone, a plantation on the Abbasid left.  In the Anglo Irish rear was a gully on the left, a plantation in the center and a field just right of center.  The hill was well placed in the center of the Anglo Irish muster zone.

Deployment:

The Abbasid's seem to be presenting a strong right force of 5 Light Horse and 4 Heavy Cavalry.  Their center is 6 Cavalry supported by 4 Light Infantry.  Their left is their weakest Battle, with 3 Light Horse and 2 Cavalry.

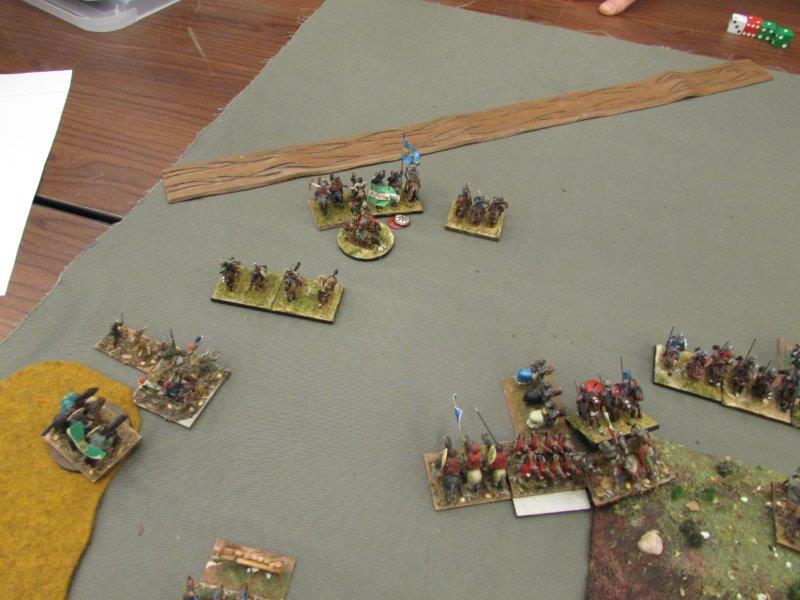
The Anglo-Irish have their identical 6 unit commands on the left and right, while in the center only 4 Longbow can be seen.  Four Galloglaich units are hiding in the ambush marker behind the hill.
The Abbasid right and center.
The Abbasid center and left.
The Anglo Irish right.  The ambush marker has a Kern Light Infantry unit in it.  Since I am facing a lot of Light Horse I am keeping my own Light Horse tight in the line.
The Anglo-Irish left.  Like the right, I am keeping my Cavalry units tight in the line.  Off panel to the left is an ambush marker.  This becomes important later.

The Anglo Irish center.   Half of the Battle is visible, Longbows and fortifications.  Behind the hill are 4 units of Galloglaich, which cannot be seen.
Turn 1:
The Abbasid's move out on both the left and center.  On the their right Light Horse moved out, but the the heavier Abbasid Cavalry held firm.
The Galloglaich are pulled from ambush and ascend to the hilltop.  The Longbow abandon their fortifications and start shooting at the Light Infantry.

The Irish left and right hold firm awaiting an opportunity.
Turn 2:
On the Irish left, the Abbasids split their LH force, possibly thinking the Irish were going to continue to stand pat.  But as a player, I am institutionally incapable of standing around and waiting.  The Irish left wing moves forward.  Longbows shooting at the Arab LH, to no effect, while the Irish LH challenges the Arab LH Impact.  The center Battle pivots and shoots with its left side longbow, adding to the discomfort of the Abbasid LI.

The Abbasids, seeing the Galloglaich for the first time, decide there is no way they were going to challenge the hill and retreat their Medium Infantry.  The center right Longbow pile on to the LI.  One Galloglaich takes a hit from Arab bowfire, but it is rallied off.  The Arab LI line is now in total disarray. 
On the Irish right, the Arab LH is trying to race around the flank.  But the Irish have advantages in numbers, missiles, fortifications and armor. But the Arabs have the advantage in maneuvering, so we will just let them come. 
Turn 3:
Abbasid Light Horse charge!  Followed with support from the next tier of LH.  Using their speed and maneuvering advantages to wrap around the Irish Javelinmen.  Which will then wrap the Longbowmen.
Part of the Arab Light Horse charge was pulled back as the ambush in the gully is revealed.  A unit of Kerns (furthest left Light Infantry unit) pulls out and gets behind the Arab Light Horse cutting off it's evade move.  Which is then charged by the Javelinmen, destroyed, routing through friends followed by the pursuing Javelinmen.  Between that and missile fire, the Arab right side command is coming apart.
On the right flank the Arabs continue to maneuver.  But the Longbow from the center battle are unopposed and are free to intervene, They turn 180 and fire, scoring a hit.  The ambush is revealed as well.  Another Kern unit, in the lower right, which will do just fine behind the fortification.

Turn 4:
Joe admitted afterwards that the ambush totally derailed his plan of attack. 

When in doubt, attack.  The Arab Light Horse engages all possible targets and the heavier cavalry moves forward to engage the Irish Noblemen and Anglo Knights.  The Light Horse score two hits on the Longbow and destroy the Kerns.  But the Javelinmen win their fight.
On the Irish turn, the Irish Light Horse charges the Arab Light Horse, which evades off of the board.  The Javelinmen, flank another Arab Light Horse, destroying it.  The Longbow of the Center Battle (right side of the picture), now free of any interference from the Arab LI, are free to shoot at the Heavy Arab Cavalry now arriving in field.
The Arab Foot command sensing it is needed, move forward again.  The Galloglaich leave their hill to both challenge the Arab foot, and sweep up the LI.
Turn 5:
The Arab Heavy Cavalry charges.  With support advantages and only one hit from missile fire, they tear through the Irish Nobles like tissue paper.  The Anglo Knights, with the help of excellent dice, win their exchange.  But the only help they are going to get are from the nearby Longbow units, one of which is near exhausted.
This is a poor picture, sorry.  The Arab foot continue to fire their bows, scoring a hit on the Red Longbow unit, but receiving a couple hits in return.
The Galloglaich from Ulster, Stafford and Clan Ramsay charge!  They expected little resistance, but the Arab foot was made of sterner stuff.
Sometimes a cloud has a silver lining.  Because the Irish Nobles were obliterated (next to the Anglo Knights) the left wing of the Arab Cavalry was free to be shot at.  The Anglo Knights, flanked on both sides, managed to hold on, taking just one cohesion hit. 
Turn 6:

The Abbasid Cavalry continue their attack.  Going all in with their General, and taking both the Anglo Knights and Javelinmen from the rear.
The Arabs lost a Heavy Cavalry to the Longbow, but traded it for an Anglo Knight.

The right flank wasn't getting much press.  An Arab LC tried to shoot the gap between the fortifications, but was shot up and destroyed.  The Arab Mixed Spear bow unit destroyed a Longbow unit, and damaged another.  But the Galloglaich have destroyed their opponents.

At this point the Abbasid Arabs had reached their break point of 25 to the Anglo Irish 12.


Monday, June 20, 2016

Crusaders vs Anglo-Irish

A Headless Body Production

Location:97 Sunfield Ave, Edison NJ, 08837 
Event:NJ Con's Fire in the East  
Players: Phil Gardocki, playing the Anglo Irish 
               Cy Tayler, playing Crusaders  
Game System: L'Art de la Guerre, 200 points per side. 

It's the first round of the L'Art de la Guerre tournament at NJ Con's Fire in the East convention. I go to this tournament with a lot of reticence.  It didn't help that I played a practice game on Wednesday and they were soundly defeated. But I have been playing Anglo-Irish with other game systems and it's my favorite army. But it does not play the same in LADG. 

For one thing, the Galloglaich (Gaelic for Young Foreigners) which are the main combat troops, are scary in Warrior. In addition to a 2 Handed weapon they also have javelins as a bonus to hit on impact, as a missile weapons. This makes them very utilitarian in a role to sweep away lights, and very dangerous against mounted. In LADG, they are no panty waists, but neither are they exciting. 

What I lost in Heavy Infantry, I gained in effective missile fire. The Longbow are very dangerous, especially to mounted, while in Warrior, it was dangerous to expose them to missile fire. 

The Forces Crusaders (there is some guesswork here)
       4 Spearmen (Mediocre)
       4 Crossbowmen
       5 Knights Impetuous
       5 Heavy Cavalry Bow (?)
       2 Light Horse Bow
       2 Heavy Cavalry Impact 

Anglo Irish: Commanders  Larry, Darryl, and Darryl.       
       6 Longbowmen (two elite)
       2 Kerns, Light Infantry  Javelin
       4 Galloglaich, Heavy Infantry 2H Sword (all elite)
       2 Light Cavalry, Javelin
       2 Irish Foot, Javelinmen
       2 Anglo Medium Knights, Impact (both elite)
       2 Irish Nobles, Heavy Cavalry
       5 Fortifications


A note on the organization of the Anglo-Irish Battles. Battles was the term applied to commands in Medieval times.  The main Battle, lead by Larry, who is a competent general, has 8 units in it. The 4 Galloglaichs (Gallic for Grey Foreigners) and 4 longbow. 

The other two battles, each lead by Darryl, also a competent general, contain a Longbow, a Kern, a Light Horse, a Javelinmen, a Knight and a Heavy Cavalry. 6 units, all very different. The thought here is no matter what the terrain is, there is a something here that can deal with it. Not enough force to win, but with proper team work enough to avoid losing. I am regarding these Battles as "Utilitarian". 

Hopefully it will confuse my opponent long enough to bring the first Battle into the fight to win the game.

The Board: The Irish lost the initiative and the Crusaders decided to attack them in the plains. The Irish were required to take a field, and selected 2 plantations, a hill, and the road. This would be standard throughout the tournament.  My opponent took a gully and field. He managed to move the hill to the center of his side of the table, but I rolled a 6 and pulled it back to my side of the board.  In the Anglo-Irish rear are two plantations, another field and the gully.  

Deployment: Cy placed his first Battle, consisting of 8 units of infantry on the Crusader left. His second Battle, with numerous Heavy and Light Cavalry on his right. In the center was deployed 5 Knights and 2 Heavy Cavalry Bow. The Irish flanks had their single Light Horse units deployed forward. Their single Longbow units were behind fortifications. The other units were pulled back ready to react as needed. In the center was the hill. On both sides of the hill were Longbowmen. 3 of the Galloglaich's were ready to take the hill.
The Crusader left flank.  The ugly piece of felt is a field.  Knights and Heavy Cavalry Bow in the center, Mediocre Spearmen on the right.


The view from the Irish center-line.  Sorry for the poor picture quality.

The board from the grand aerial view.  The Irish are on the left.  The LH was ready to skirmish, A LI is hidden in the ambush marker.  The right flank Battle is bolstered by 4 fortifications.

The Irish right flank.  There are more fortifications then troops to man them.  But that gives me options to adjust my forces to suit.

Crusader Crossbow and Spearmen ready to go.  They outnumber the Irish right flank unit for unit, and have more effective missile fire.
Turn 1:
The Crusaders advance, pushing their Crossbow into the field, and advancing their right flank cavalry.  In the center, the Knights are being held back.  Probably a good call with 2 handed swords on the hill with Longbow support.

The Galloglaich take the hill.

I think this was intended to be the main Crusader attack.  But if the Crusader Knights hold up in the center, then the Longbow on the hill are free to shoot in support of the flank command. 
Crusader Crossbowmen and Spearmen split up.  The Irish realize their Longbow and Javelinmen are going to have to exchange fortifications.


Turn 2:
The Crossbow men leave the field to exchange fire with the Longbow.  They have a 2-1 advantage in numbers, and the excess is free to pick on the flanking Galloglaich.

The Spearmen are not going to stop for a couple of ponies.

The Crusader right flank troops get aggressive at the joints between the Irish left and center Battles.  If they can close with the Longbow undamaged, they have an excellent chance with Heavy Cavalry vs MI +2, Impact +1 and Furious Charge for +1 cohesion hit.
Turn 3:
The Irish reveal their left side ambush is revealed.  A Light Infantry Kern unit pops out of the gully and advances to support the Javelinmen with an exchange of missile fire where both the Javelinmen and the Light Horse takes a hit.  On the upper right, the Heavy Cavalry has taken 2 hits from the Longbowmen near the hill.

The Crossbowmen continue to pummel both Longbow and Galloglaich, but to no effect.

Flanks be damned, this battle will be decided in the center.  FYI, the ambush is a fake, but it is fooling no one.

There is a thunderous roar as the Heavy Cavalry charge!  Blowing away one Longbow like chaff to the wind, but the other Longbow unit holds its ground against the damaged Heavy Cavalry unit.
Without the Longbow supporting the left, the Galloglaich may have the hill, but will be outnumbered, and out armored. 
The Irish are not standing still though.  The Galloglaich of Clan Stafford charge down the hill and win the dice roll off against the heavy cavalry.  While the left flank Anglo-Irish Knights flank a Crusader Cavalry, destroying it, and pursuing into the other Crusader.   Most of the remaining Crusader forces on their right flank are in disarray being either threatened or shot up and are not in a position to challenge the Anglo-Irish Knights now rolling up their flank.
The Anglo-Irish left flank has things well in hand. 

On the Irish Right flank, The Javelinmen have left their forts, becoming the missile priority.  This gives the Galloglaich a chance to rally, provides an opportunity for a cavalry flank charge, and provides a target for the rightmost Longbow unit.
Turn 4:
The Knights charge.  Their opportunities are not going to get any better.  On the left they penetrate the Galloglaich line.  The Ulster boys take two hits, but Clan O'Lyre holds its ground unscathed.  The Knights do destroy one Longbow unit, and do 2 hits to the other.

The Crossbowmen see the trap they are in and pullback to the field.

The Spearmen continue to advance.

The Irish respond.  The Longbow on the right are gone, but the Galloglaich still hold the high ground.  On the Left, Clan Stafford takes one Knight in the Flank.  Clan O'Lyre takes a hit but still holds as well.  The Ulster boys destroy their Knight with the timely flank charge from the Anglo-Irish Knights, which then pursue into Clan O'Lyre's opponents.

Despite being outnumber 4-1, the Javelinmen pursue the Crossbowmen.  Not that they can win, but they are covering the Irish Nobles so they can charge more Crusaders in the flank unimpeded. 

Not much change on the left, but a Crusader Light Horse has been shot away.
Turn 5:
I have been playing ancient miniatures for over 30 years as well as 9 games of LADG, so there is no excuse for me not knowing some of the basic missile fire rules.  Foot bowmen, including crossbow and longbow, all get a +1 shooting at mounted.  I didn't know that until Cy took a shot at my Irish Nobles.  I have not been counting this factor with all my shots on the Knights, as well as previous games.  Cy got my vote for sportsman as he decided not to take the same plus for his crossbowmen against my mounted.  We then argued about it.  In the end he scored +2 over what he needed so the point was moot.

The second thing I learned is missile troops suffer a -1 when shooting while disordered.  Of course this makes sense and didn't effect the game.  But I am embarrassed I didn't know it.

Another Crusader Knight is removed.  The Crossbowmen still managed to get a shot on the Irish Nobles, and were subsequently charged and took two hits themselves. 


The hill is cleared and the only Crusaders that can contest it are damaged.  On the right there was another Crusader Knight charge on the damaged Galloglaich Clan Ramsay.  The lower right of the picture next to the '3' chip.  Clan Ramsay took two hits, but in turn was supported by a Longbow, and the Crusaders were taken in the rear by Anglo Knights. 


At this point the Crusaders hit their break point.  The final score was score 22-12.