Wednesday, October 28, 2020

A Turmoil of Turks

A Headless Body Production
Venue: A Completely Different Undisclosed Basement
Event:
Playing a game for the camera
Players:
Phil running Thematic Byzantine
              
John Doe running Ottoman Turk
Game System:
L'Art de la Guerre, 15mm, 200 points per side.

Friday evening, time to head to the basement for some miniature action.

Same forces as two weeks ago, described in, An Objurgate of Ottomans, But played on a different board with a different set of figures.

I have done over 200 of these battle reports, but this is the first one where none of the figures are mine, and I didn't take the pictures. So I have minimal memory of the game, and the images are not helping much.

So it is just like your perspective, as the reader, then me as the writer.

It was weird just looking at the first picture. I don't even know which side of the board I am on. Turns out I am at the top, when normally I am at the bottom. At least the lists are the same as last week, so I have one frame of reference to draw on.

The Forces:
Ottomans (list 251)
Commanders, 2 Brilliant and one Competent
6 Sipahis, Heavy Cavalry Bow
2 Syrians, Heavy Cavalry Impact
4 Akinji, Light Cavalry Bow
2 Bedouins, Light Cavalry, Impact
4 Janissaries, Medium swordsmen, Bow, Elite
2 Azab Bowmen
1 Light Infantry, Bow
Breakpoint of 21

Thematic Byzantine (list 127)
Commanded by Nikephoros (the younger), Brilliant, Pumaphoros, also Brilliant, and Adidasphoros, the Ordinary, and somewhat Unreliable.
12 Thematic Kataphractoi, Medium Cavalry, Impact and Bow
4 Cursors and Alans, Light Cavalry, Bow
3 Skutatoi, Heavy Spearmen, Missile Support, Mediocre
2 Light Infantry, Bow
2 Light Infantry, Sling
1 Light Infantry, Javelin
Breakpoint of 25 

The Board:
The Ottomans win the initiative and elect to attack in the plains. The terrain is heavy with 3 fields, a plantation and a hill. 

Deployment:
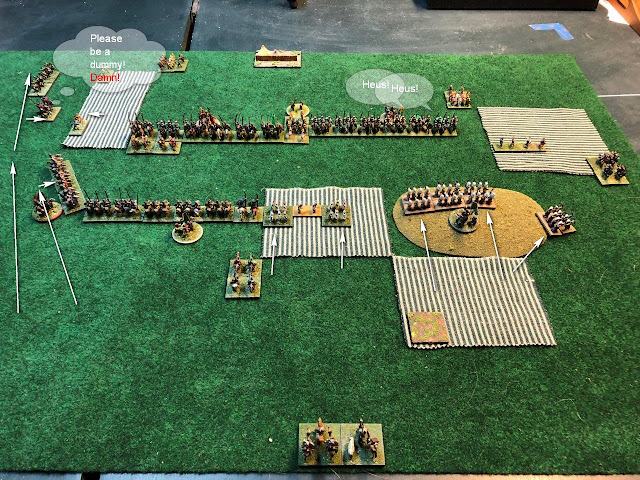
The Ottomans have two identical cavalry commands, each with 4 heavies and 3 lights, led by a brilliant commander deployed heavily on their left. Their Janissary command is not to be seen.

The Byzantine cavalry commands fit perfectly in the 13 UD gap between the fields. LC is positioned for screening, LI in the fields.
The view from the Ottoman left
Some forgotten troops missed their wake up and were late arriving. I'm just labeling the new figures as I had already annotated the deployment photo above, and did want to do it again.

Turn 1:

The Byzantines decline the delay of game penalty. The Ottomans move out.
Pretty much just a straight line. Light Horse running around the Byzantine right flank.


The Byzantines move out, but hold to the fields edge and keep their distance from the Turk foot bow. As Medium Cavalry (ordinary) they are pretty vulnerable to bowfire.

Off of the right edge of the picture, Alan Light Cavalry race up the edge. If they can get by the Jannisaries, the Turkish camp is vulnerable.
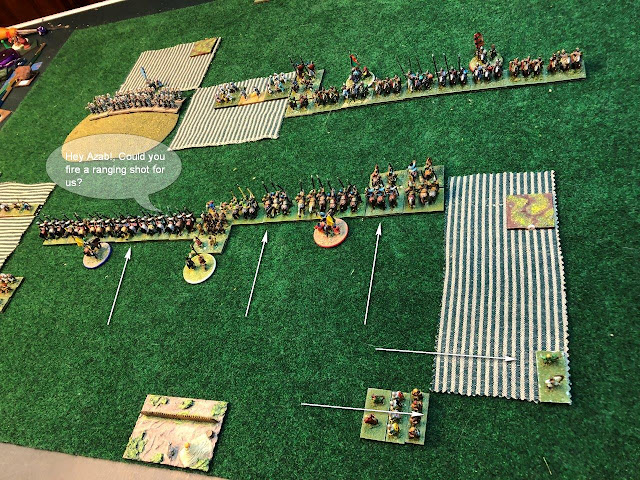
The view from the Byzantine side of the board.


Turn 2:

Ambushes are all revealed. Foot bow loose arrows, and the Byzantine horses begin to fall.

Turk light horse find Psiloi in the fields. Their heavy horse take a position to flank Byzantine cavalry should they decide to charge out.

The Byzantines have the advantage with missiles, as all of the Kataphractoi have them, while the Turks have only 6 heavy cavalry that is bow armed. But the Byzantines also all have lances, while the Turks have just two. 

But the Turks have 6 foot bow units, and they can ruin the day of medium cavalry.

Once in range, the Byzantine cavalry have only one choice, and that is to charge, even though it is up hill. They could have withdrawn, but that would just give the Janissaries a chance to run them down, shooting them in the back.

Fortune favored the fools. The Janissaries have two units run down, including their commander.

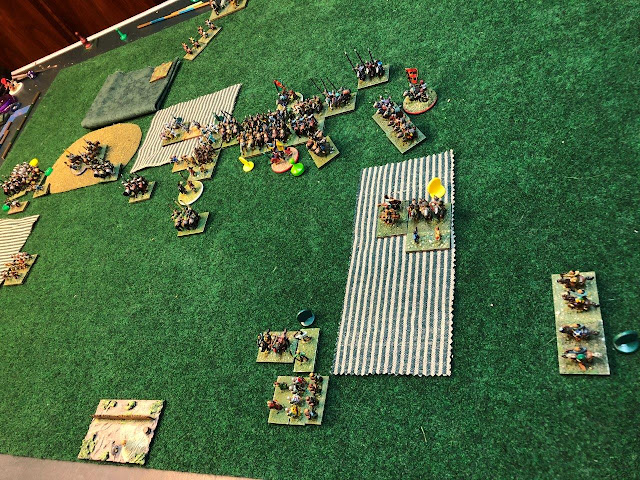
The view from the Byzantine left. Half of their cavalry is disordered, but the position on the hill is secured.

Turn 3:

The last Janissary on the is not going down without a fight, and destroys a Thematic Troop.

Ignore the red XX on the hill, that is an error. 

The Turks are being patient. Their Azab foot archers are safe in the field, they just need to clear the Psiloi from the field, and turn the Byzantine flank.


Ignore the dice, the score is 10 out of 21 for the Turks and 6 out of 25 for the Byzantines


The Byzantines commit.

Charges down the line. In the open area, Turks resist the charges, tieing 2, winning 1, and lose the fourth. 

So the Byzantines have penetrated the Turkish line, but their forces are now fighting just mounted on mounted where the Turks have the armor advantage.

A Janissary is killed on the hill in a similar manner, while the last one is taken in the flank and rear.


In the field on the Byzantine right, Psiloi charge Turk Heavy Cavalry, then a Thematic Cavalry flanks the unit as well. 


Casualties climb rapidly. 17 to 13 in favor of the Byzantines.

It was at this time Dave realize that he was not counting the dead correctly, and was much closer (1) to demoralization then he thought.

Turn 5:

In the field, a desultory charge by Bedouins into the Psiloi flank. But to no effect. But the Byzantine Thematic Cavalry in the field is ridden down by a Sipahis flank charge.


An Azab is destroyed in the field, another picked up a missile hit. The last Janissary is destroyed. Taking the Turks over their demoralization points for a Byzantine win.
The view from the hill.

So what was different from this fight from the last game, An Objurgate of Ottomans, where the Ottomans thoroughly trashed the Byzantines?

In short, the terrain, and how it was played.

Last game:

The Byzantine Front has a field on their left
While on their right the Ottomans have a Coastal, a village and a field on their left.
Today's game also has the Byzantine flanks covered by a field, and the Ottomans have a hill and and field on their right flank.

It looks pretty similar, but there are some differences that were crucial.

First, the force projection of the Janissaries. In the first game, they were in a field, some 9-13 UD's from the edge, with bowfire range, they were projecting up to 17 UD's from the edge, almost to the center of the board.

In this game, they were on the Hill, some 8-9 UD's in, and could project 13 UD's with bowfire. The Field next to them had a pair of Azabs, also bowmen, which project to the center of the board if need be. 

But a gentle hill is not a field bordered by a village, which is Difficult terrain. And while the hill still provides a +1 in combat with a height advantage, it is not like a field, where Cavalry are -2 and lose impact. In short, the Janissaries were immune to cavalry in the first game, while they were merely a difficult problem in this game. And a couple of favorable die rolls were all that was required to take them out.

Thursday, October 22, 2020

A Horde of Hastati

A Headless Body Production 
 
Venue: An Undisclosed Living Room
Event: L'Art de la Guerre via Table Top Simulator
Players: Phil Gardocki running Carthaginian
               Dave Ray running Republican Rome
Game System: L'Art de la Guerre, 200 points per side.

For over a hundred years, the Punic wars were fought on hundreds of battlefields. Many of these battles were important enough to have the accounts reported by the great historians.

This was not one of them.

However, in a farmers field in central France, a flint beer bottle and a fragment of petrified tapioca was uncovered. The text was engraved in nearly perfect Lorem Ipsum, which confirms the local legends of a great battle fought there, some 2,100 years earlier.

The Forces:
Carthaginian, list 55.
Commanded by unidentified commanders, we shall refer to as Larry, Darryl and Darrel.
We will assume they are Competent.
4 Heavy Spearmen, Armor Elite
2 Italians, Heavy Swordsmen, Armor , impact
2 Moors, Light infantry, bow
1 Elephant, Mediocre
5 Gallic Warriors, Medium Swordsmen, Impetuous
4 Punic Cavalry, Medium cavalry
2 Heavy Cavalry, Heavy cavalry, Elite
2 Numidians, Light Cavalry, Javelin
Breakpoint of 23

Republican Rome, List 53
Commanded by Scipio and Mettalus, both Ipsum Dolor, and Scarus, the Auctoritas.
8 Hastati or Principes, Heavy Swordsmen Armor, Impact
2 Triarii, Heavy Spearmen Armor
4 Velites, Light Infantry, Javelin
2 Cretans, Light Infantry, Bow, Elite
2 Gallic Warriors, Heavy swordsmen, Impetuous
2 Extraordinarii, Medium swordsmen, Elite
2 Illyrian, Light Cavalry, Javelin
Breakpoint of 22

The Board: Scipio wins the initiative and elects to defend in the plains

Why Carthaginians? Table Top Simulator offers a chance to play armies that we don't have figures for. While I can deploy 16 feet of 15mm Romans, and I have done it. I would have to piece together a Carthaginian list out of parts from several other armies. They have never interested me, and when I look at the list, nothing stands out as a game winner. It says much about Hannibal's brilliance that he could take this army composed of disparate parts and work it as a whole, not just to function, but to win against the premiere force in the world.

I have to say, though, the lists for the Carthaginians just suck. Not enough of anything except Gallic warbands to matter. And those are totally overwhelmed by Roman infantry. +1 vs +2 on contact. Taking 3 hits vice 4. This is somewhat mitigated by Furious charge doing extra damage on the turn of contact but after that it is down to even up rolls and Roman Armor.

Editor's Note: I have been adjusting the pictures to try to present the most informative views. Mainly by cropping to the region of interests and magnifying the picture. I am still working out the kinks in this process. But these pictures are a bit smaller than I would like. You can still double click on them and get "Original Size", and while bigger, they are not as big as I would have liked.

Other Notes:

When you see a word bubble "Ouch", this implies a missile hit, except on turn 2, which was a mistake.

"XX" implies a unit killed in that location on that turn.

"????" is an ambush marker, and so it is unknown at this time.

Scores are presented in a confusing manner. This is because it is measured in number of points towards the demoralization. If I say the score is 15-8 in favor of Rome, that means the Carthaginians are have 15 points their demoralization level of 23, while Rome has 8 points towards their demoralization level of 22. But saying 15-8 is just more intuitive. 

Not all actions are commented on. Like units chasing lights. Lights don't matter much and don't rate much commentary. Except for Illyrians. If they had lived, they would be the MVP's of the game. Oh...Spoilers!

The Romans are deployed in a solid line of 10 Legionary and two Gallic Heavy Foot. They outnumber my Heavy Infantry by 2-1, and their flanks are well secured. 

The Cunning Plan:

My thoughts are to use the field on the right as a safe area to project into the flank of the Roman line. The Carthaginian main battle line of Heavy Infantry can stand up to the Roman Infantry and will have one flank covered by the Elephant command, the other, hopefully by the Cavalry command. The Pontic Cavalry, which should be the maneuver wing has no where to maneuver into as the Roman right flank is also covered well with a field.

Turn 1:


A general advance is ordered. The advance is limited by both enemy lights and poor command dice rolls. 


The Romans see through the plan immediately. They pull back their exposed flank, and send forth the Illyrians to harass the Carthaginian Elephant command.


Turn 2:


More general advance, and into the field we go. On the right, the Gallic warriors charge the Illyrians, who stand.and receive the charge. There was a chance if they evaded, that they would go of the board. The Gauls are surprised at this and tripping over their feet, disorder themselves.
Romans advance save their impetuous Gauls. Ray didn't realize that foot impetuous are not required to charge mounted troops.

And the Illyrians, lightly armed and armored, disperse their Gallic opponents.

The score is 3-0 in favor of the Romans.

Turn 3:

On the left, Punic Cavalry has turned the flank of the Roman Line. However, they cannot take advantage of it due to being ZoC'd by the Extraordinarii in the field.
The Romans have completed their refuse flank maneuvers. There is no longer a danger of elephants charging them in the flank from the field. Illyrian Light Horse follow the Carthaginian line, merrily throwing javelins into the mix.

Turn 4:

All that maneuvering, and in the end it's just a front to front smashup. Romans win the dice offs, 5 out of 8 fights.
The second round is a bet better for the Carthaginians. 4 of their 6 Heavy Infantry are Elites, and that was a factor in a couple of the dice offs down the line. A cheap Pontic cavalry unit is destroyed, but another is ready to take it's place. Illyrian aggressiveness continues. The Elephant is being stung, while a Gallic warband is struck in the rear.

The score is 10 to 4 in Romes favor.

Turn 5:

Carthaginian Heavy Infantry begin to die but they are not going alone. Contrary to the lower right notation, the score is 14-9.
And in a major turn around and a bit of good fortune the Carthaginians defeat a number of their foes. Two Legionaries are destroyed, and one of the annoying Illyrians! The score is almost a tie at 18-16.

 Turn 6:


Elephants are gone, but they were a throw away anyway. The Roman left flank is turned. The score is 19-17, in favor of Rome.
Whoa, dead units all around, but mostly Roman. Several very bad die rolls for Rome. On the left, Pontic Cavalry (Heavy, Elite, supported, but also flanked) destroy a Gallic war band. Another Roman Legion flanks a Carthaginian Spear, but fail to destroy it. The Roman General Scarus joins his Legio, and promptly takes a spear in the eye! The last of the Illyrians is also dispersed.   
 
The end result is a MUTUAL DESTRUCTION. Both sides are exactly sitting on their break points.
 
To tell the truth, I never thought the game would go the distance. I do not like the Carthaginian list. About the only thing I do like is their cavalry. If you are fighting in their region and time period, it is pretty good. But in this game they were largely a non starter. I would have been better served by filling the left with Militia (Medium Sword, Mediocre). Hmmm, that is not so bad. 6 units, 30 points, freeing up 20 points for more elephants and skirmishers... But then it was the field that defanged the cavalry. If it wasn't there, they could have collapsed the Extraordinarii and turned the flank.
 
This just in! After the teams have left for the showers a flag was thrown on the field! A penalty is called! Incorrect Point Counting! Romes break point was incorrectly added as 22 when it was 23! So the game is a Win for Scipio and his team!

Friday, October 16, 2020

The Proper Plurality of Elephants is ... Elephant

 A Headless Body Production

Location:  An Undisclosed Livingroom
Event:       Monday's regular Tuesday Game
Theme:     Pachyderms
Players:    Phil Gardocki playing King Porus of Purus.
                  Dave Ray playing Tamel
Game System: L'Art de la Guerre, about 200 points per side. 

When I suggested I wanted to play classic Indian, I was hoping Dave would pick something like Roman, Chinese, Parthian.  But nooooo..... The best answer to an elephant, is another elephant.

The Forces:
Classical Indian (list 79) King Porus, Prince Malayketu, and Prince Porus, all Competent
      3 Elephant, Elite
     10 1/2 Medium Swordsmen, 1/2 Bowmen
      5 Light Infantry, Bow
      2 War Wagons, Bow, Mediocre
      1 Medium Cavalry, Mediocre
Breakpoint of 21

Tamil Indian (list 121) One Brilliant and two Ordinary commanders, whose names are lost to antiquity.
      6 Elephant
      2 Guardsmen, Medium Swordsmen, Impact, Elite
      6 Light Infantry, Bows and Javelins
      4 Bowmen
      2 Light Chariots, Bow
      2 Warriors, Medium Swordsmen, Impetuous
      2 Javelinmen
Breakpoint of 24

So not only are the Classic Indians out elephanted, 2-1, but the Tamils have a higher break point!

Title Side Note.
The Proper Plurality of Elephants is ... Elephant.  Who knew? Merriam Webster did.


Translation notes:

     रैली!  --  Rally!
     आउच!  --> By the Bhagavata, those bastards shot me in the ass!!!
The Board

King Porus wins the initiative and elects to defend in the woods.
Deployment:

The Tamils are at the top of the board

My thoughts was to launch a flying column of elephants, wheel left, turn, then attack the right flank of the Tamils.  It is a plan I have used time and again.

Turn 1:

And it is a plan that Dave has seen, time and again.

And, admitably, I have rarely run this plan when defending, and  never with elephants

Slower, less maneuverable, I should have paid for the better ballet slippers.

Turn 2:

The plan was a bust, but on the bright side, the Tamil plan was right on track!

I could have saved this on turn 1, but on turn 2, my only choice was to charge.

The matchups were not that bad.  Swordsmen against bowmen (supported), elite elephant vs ordinary, Elephant vs MI.  All sans one dice off went in my favor.  That one however, went horribly wrong.  The score is 7-5, in favor of King Porus.

Turn 3:

The victory was short lived.  The Tamils counter attack.  For the first time ever, we have witnessed Elephant on War Wagons, not once, but twice!  When the dust settles, the Tamils have lost a troop of elephant, but were winning 13-10

A War Wagon is wrecked.  The Tamils have another troop of elephant flanked and destroyed, and a third, their commander astride, is just out and out 6-1 killed!  But most of the blood on the ground is Purus.  And the score is a virtual tie at 17 (Tamil) to 16 (Purus)

Turn 4:

The Tamils withdraw a chariot, but attack an elephant with supported Light Infantry.  But they do not have enough command to hit that elephant in the flank.  Fortune favored the fool-hearty, and the LI wins!

The score is Tamil 19 out of 25, Indian 20 out of 21.

For the sake of my sanity, the score represents the number of points towards demoralization of that army.  Low scores are better.

At long last, Porus manages to get another troop of elephants into the fight. Another will get in on the next turn.
The score is Tamil 21 out of 25, Indian 20 out of 21.
Needing only 1 point, the Tamils turn one foot on Porus's elephantry, destroying it out.  Subsequent die rolls destroy a 4th Tamil elephant.  The Tamils Win!

So what went wrong?

That the concept that the flying column would work.  The column was not going to progress.  As a result, my main force of elephantry went in piecemeal.  And as such they were still very effective. Taking out two elephants and two other units.  It would have been better have put them in the woods.  A double march would have gotten them on the edge, and one more move to clear. 


Sunday, October 11, 2020

An Objurgate of Ottomans

A Headless Body Production

Venue: An Undisclosed Basement
Event: Playing a game for the camera
Players: Phil running Thematic Byzantine
John Doe running Ottoman Turk dressed in drag
Game System: L'Art de la Guerre, 15mm, 200 points per side.

It is Sunday afternoon, and the back yard work is done. The privet hedge is trimmed, bulbs have been dug up. Time to head to the basement for some miniature action.

The Forces:
Ottomans (list 251) I have no Ottomans, but the Samurai were out for tomorrows game, so they will have to do.
Commanders, 2 Brilliant and one Competent
6 Sipahis, Heavy Cavalry Bow
2 Syrians, Heavy Cavalry Impact
4 Akinji, Light Cavalry Bow
2 Bedouins, Light Cavalry, Impact
4 Janissaries, Medium swordsmen, Bow, Elite
2 Azab Bowmen
1 Light Infantry, Bow
Breakpoint of 21

Thematic Byzantine (list 127)
Commanded by Nikephoros (the younger), Brilliant, Pumaphoros, also Brilliant, and Adidasphoros, the Ordinary, and somewhat Unreliable.
12 Thematic Kataphractoi, Medium Cavalry, Impact and Bow
4 Cursors and Alans, Light Cavalry, Bow
3 Skutatoi, Heavy Spearmen, Missile Support, Mediocre
2 Light Infantry, Bow
2 Light Infantry, Sling
1 Light Infantry, Javelin
Breakpoint of 25 

The Board:

The picturesque River Danube anchors the Byzantine right. Nikephoros wins the initiative and elects to attack in the plains. The Ottomans select a village and a field. The positioning is perfect for restricting the board down by 40%. Not allowing much room for the cavalry to maneuver. 
The gap between the field on the left and the field on the right is around 11 UD's.
 
Deployment:
The Ottomans have two identical cavalry commands, each with 4 heavies and 3 lights, led by a brilliant commander.
They are deployed hub to hub
And mirror images in deployment.
The Janissaries are deployed to invest the field.
The Byzantines deploy a "micro-command" on the right.
And also have two nearly identical commands of mixed cavalry and foot.
The Byzantine line is some 14 elements long, the open space is only 11 elements wide.

But the open space is even narrower. The Janissaries are bow armed and elite, and project 4 UD's from the field. The Byzantines also have bow, but are not elite, and cavalry is more vulnerable than foot, so it is a very bad matchup.


Effectively the Ottomans have totally removed the Byzantine numbers advantage 25-21 units, 16 shooters to 14. Now this is down to a quality on quality fight, where the Ottomans have the advantage.

Turn 1:

Adidasphoros rolls a 1 and goes unresponsive.
Nikephoros (the younger) also rolls a 1. He runs his Light Infantry into the field and advances.
Pumaphoros also rolls a 1 for command points.

The Byzantine right advances cautiously. There is no percentages in a shoot out against the Janissaries, so his role is more containme

The rest of their main line stands eerily quiet.
The only motion are the Janissaries, who invest the field and begin quietly emptying their quivers to good effect.
Thematic Kataphracts approach to missile range and loose arrows. Their lights advance to cover their flanks.
A 1 to 1 trade off. But the Byzantines have more effective shooters, and can do this all day.
On the Byzantine right, the Kataphractoi split. One block to threaten the Janissaries if they decide to leave their field, the other to threaten the Ottoman heavies if they should pull any tricks.
Skutatoi advances to cover the flanks of the cavalry.
The Ottomans are not going to give the Byzantines all day, and order a charge. It's heavies vs mediums, but the mediums are also impact. 
The result is a mixed. Two Byzantine Kataphracts are disordered. but one Sipahis is destroyed.
On the Byzantine right, more charges. The Byzantines lose badly. But their Skutatoi are available to run up and take up the slack.
On the far right, nothing much happening.
On the river Styx, the score is 4 to 8 in favor of the Ottomans.
A view from the sky

Turn 3:

The Ottomans have destroyed to Byzantine horse units.
Nikephoros (the Younger) makes a nube mistake. He rallies a kataphract to go back into combat, when he should have pushed one into the hole presented earlier.

That may not have been a game changing mistake, but the score would have been more even.

On the right, status quo is maintained.
The Syrians are destroyed, but the Kataphractoi flank is truly turned.
On the right. A Kataphract is flanked and destroyed, the Sipahis pursue and catch an Alan.
The score is 6-16.

Turn 4:
An offer to accept a surrender was placed on the table and declined. The Byzantine player was suffering from delusions of grandeur from those two games last month where he came back from 12-1 deficits to win.

The Byzantines trap an Akinji, then pursue into a Bedouin On the main line the a Kataphract penetrates the Ottoman line, but too late.
Desperate times, desperate measures. The Sneaker brothers are all in, leading from the front.

A real sign of the situation is that the Ottomans did not feel compelled to match the Byzantines on the front lines.

The battle is largely lost, time to withdraw the solid troops to cover the wounded.
The score is 8 to 16. (the dice are wrong)
No longer out numbered, the Ottoman horse begin to turn the flanks everywhere.
The Byzantine center, with direct support by their commanders, barely hold.
The Ottomans switch to pursuit mode. 
Ending the game at with a 10-23 win. 
Few battle plans survive contact with the enemy. This one didn't survive camp deployment. The terrain placement was perfect for the Ottomans, denying the Byzantines their advantage in numbers and maneuverability.

Coupled with a commander that played everything correctly. And dice that rolled about even down the line, and it was just a slaughter.

It is worth it to study how the Ottoman player played. From terrain, to deployment, to arraigning local superiority, to removing all the advantages his opponent had. If there was a text book on LADG strategy and tactics, this game should be in it.

The Byzantines only made one or two tactical mistakes, not enough to lose, so the magnitude of the victory was totally on the Ottoman player.