Thursday, April 27, 2023

Monitoring the Mongols

A Headless Body Production
Venue: On Military Matters Book Store, Hopewell, NJ
Event: April Showers...
Players: Phil Gardocki running Samurai
                  Dennis Shorthouse running  Mongol
Game System: L'Art de la Guerre, 15mm, 200 points per side.

The Forces:

Samurai, Commanders Larry-san (Brilliant), Darrel-san (Competent) and Darrel-san (Ordinary and Unreliable)
6    Mounted Samurai, Heavy Cavalry Bow, 2 Elite
8    Foot Samurai, Medium Swordsmen, Bow, Elite
4    Followers with Naganinta, Medium swordsmen, Mediocre
4    Bowmen, Mediocre
Breakpoint...22

Mongols.  Commanders are a Strategist, a Brilliant and a Competent.
4 Heavy Cavalry, Impact, Bow, Elite
4 Medium Cavalry, Bow
15 Light Cavalry, Bow
Breakpoint...23
   

Display Conventions: When you see a word bubble like "Ouch!" "痛い" or "Auć!", this implies a disorder from missiles. Letters in parenthesis represent some value change for the specific unit. For commanders it is s for strategist, b for Brilliant, c for Competent and o for Ordinary, u for unreliable. For troops it is e for Elite, and m for Mediocre. Other abbreviations, Hvy Heavy, XB Crossbow, LB, Longbow, Jav Javelin, 2HW 2 Handed Weapons, B Bow, Kn Knight, HKn Heavy Knight, HC Heavy Cavalry, Md Medium, Sgt Sergeants, LC Light Cavalry, Chr Chariot, Cat Cataphract, Pa Pavise, LI, Light Infantry, HG Hand Gun, FKn Foot Knight, Hvy Spear, Heavy Spearmen.

Inappropriately capitalized words are used to highlight terms that are specific to the game. For example Brilliant, Competent and Ordinary have specific game values for the commanders.

"XX" implies a unit killed in that location on that turn.

Deployment: 

The Mongols win the initiative and elect to attack in the plains.

The Mongols deploy a minimal force on their right.

On their left is their main strike force of Heavy and Medium Cavalry

Their third command cannot be seen.

Larry-san deploys his weaker force of mostly Mediocre troops on the left.  The thought is to extend the row of archers and focus their shooting on whatever occupies the hill.

His main force of sword/bowmen will anchor on the most excellently placed field.

With his horse taking the right.  His main goal here is to trade shots with the Mongol horse, and to delay them, giving his foot archers time to do their work.


Turn 1:

And their off!

On the Mongol right, their light horse stop just short of effective bow range.

And more importantly, those 5 light horse are distracting most of the Samurai army.

While the Mongol heavier cavalry can focus on the Samurai horse, 8 to 6. 

The flank march is running, most likely on the left.  3 units of Bowmen(m) turn to face.  The rest of Darrel-san's command advances and looses arrows.

While his brother Darrel-san advances into the field to offer enfilade shooting support for the Samurai cavalry.

Larry-san orders his horse to just withing arrow range.


Not bad shooting for the first round. Mongols tend to have smaller armies due to the large number of elites and better commanders.  So 3 hits is already 15% of his break point.

Turn 2:

Dust is spotted on the left flank! The Mongol flank march will arrive next turn!

The Mongols withdraw their disordered elements.

But there is no shortage of targets for the Samurai to shoot at.

I ran across this etymology tidbit last week.  The word Samurai comes from the Japanese word saburau, meaning "to serve".  

The word Knight is from Old English cniht ("boy" or "servant"), is a cognate of the German word Knecht ("servant, bondsman, vassal").

Despite being separated by  6,000 miles, and both somewhat isolated island cultures, their root word for their premier warriors is same, "servant".

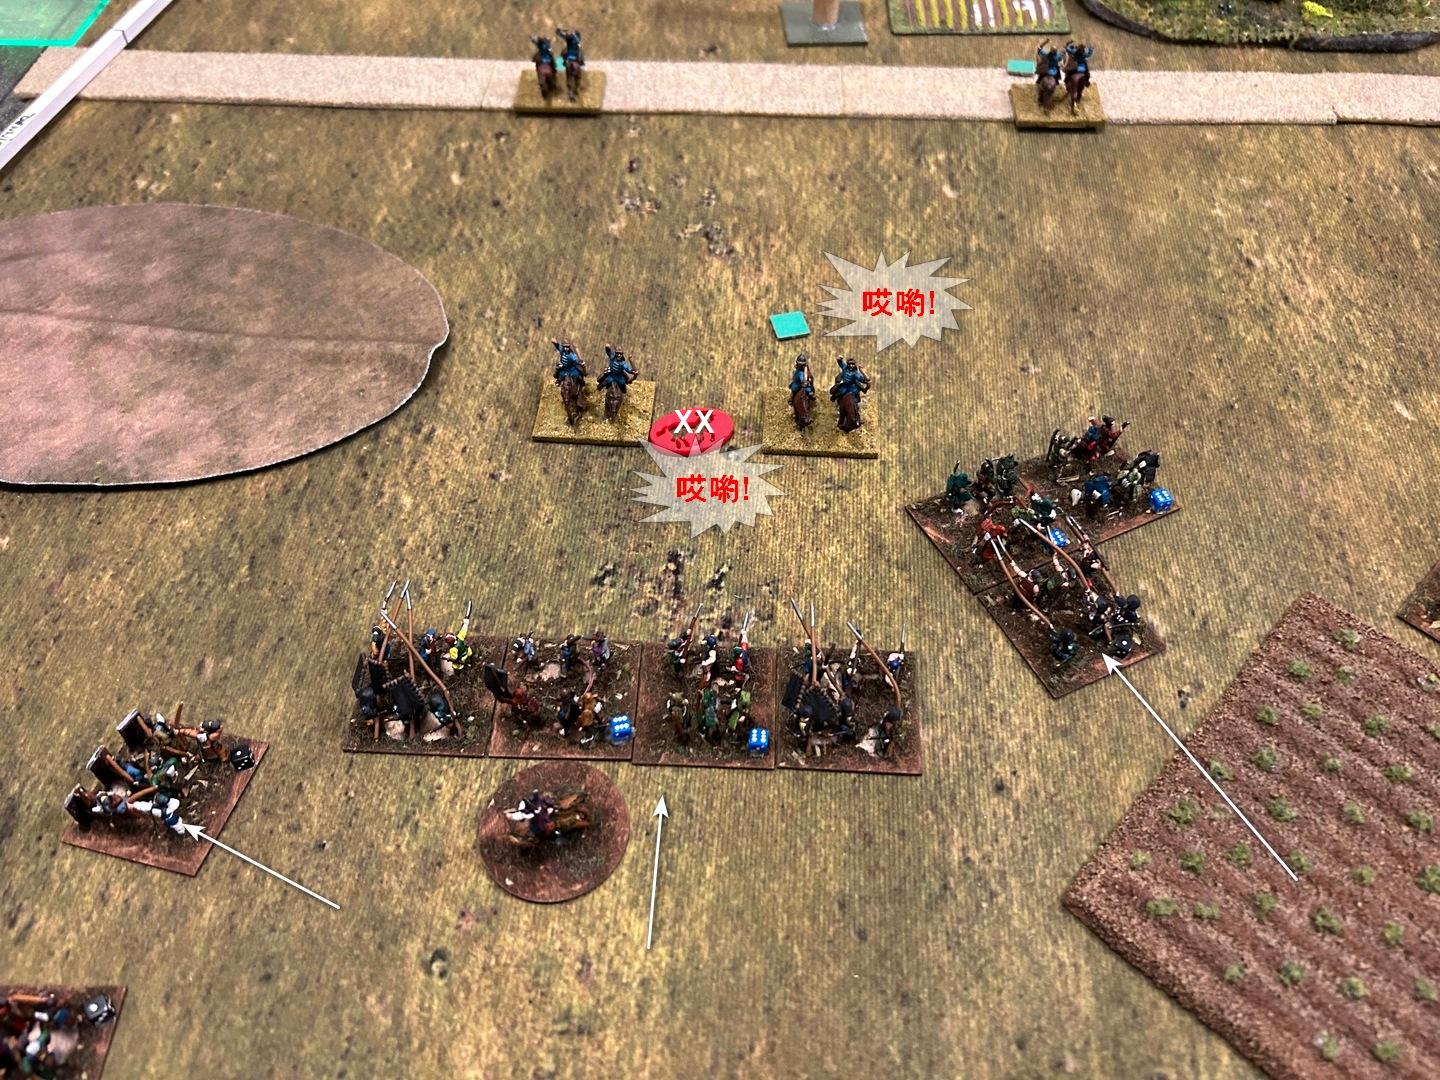
The Mongol left charges.  They have impact, and are all elite.  But despite those advantages, the battles go 1 and 1.

But the weaker Mongol Medium Cavalry did not charge.  And paid a heavy price from Samurai arrows

At the bottom of the turn, the pain just continues.  The skies just continue to darken.

Emboldened, the foot Samurai leave the relative safety of the terrain.

One Samurai horse is destroyed.

The score is currently 10 (9 of them from arrows) of 23 for the Mongols, and 5 of 22 for the Samurai.  

Turn 3:

The Mongol flank march has arrived.  3 more light horse. 

One of them slips past the blocking force and heads for the camp.

A koku buys a lot of arrows, and Darrel-san is not paying the archers to bring them back.

The center command of Mongol horse is at risk of destruction by missiles, and withdraws.

While the Great Khan continues to try and gobble up the Samurai right flank cavalry.


On the left flank, Darryl-san orders his bowman to run off the Mongol lights.  They opted to hold their ground and die instead.

When Dennis brought this command on the board, he set them up so one unit was just so slightly ahead of the other.  So when the bowmen charged, made contact, and conformed, it was not engaged.

So why didn't I just make two charges?  Command points.  This Darryl is Ordinary.  and to do so would take more command points then he had. 

The camp was lost anyway, so he needed to push forward where he was strong.

His brother Darryl-san also was busy running down enemy cavalry.

With the Mongol Medium Cavalry contained, the Samurai Heavy Cavalry actually have a numbers advantage in armored horse.  They begin to turn on the Mongol flank.

Turn 4:
The Mongols have 16 points towards their break point of 23

The Samurai are at 6

Off to the right, the Samurai camp is taken.

Their distraction force, much diminished, is still doing it's job.  8 Samurai units, 4 of them elite are attempting to run down the remaining light horse.

The Mongol mediums continue to retreat.

A second Samurai heavy horse is crushed.  But it was a trade for a Mongol Minghan

On the bottom of the turn, Samurai archery fire sealed the game with two more points.

Not much you can say here.  This crushing victory was due to excellent terrain combined with a total mismatch of troop types.  18 shooters, 10 of them elite, most with +1 against horse, against an all horse army.  


Sunday, April 16, 2023

The Battle at the River Trebbia

A Headless Body Production
Venue: On Military Matters Book Store, Hopewell, NJ
Event: Trebbia
Players: Phil Gardocki running Hanibal and Hasdrupal
               Dennis Shorthouse running  Mago
               Al Kaplan running Sempronius Longus (a political appointee and an impetuous cad)
Game System: L'Art de la Guerre, 15mm, ~203 points per side.

This is a running of one of four scenarios created by Dan Hazelwood.  For the full pdf, go to the forum and look up Punic Wars Scenarios for ADLG.pdf.

The Forces:

Carthaginian
Hannibal the Strategist, Mago, the Competent, and Nameless, also Competent
3 Spanish Cavalry, Medium Cavalry
2 Punic Cavalry, Heavy Cavalry
1 Picked Cavalry, Medium Cavalry, Elite
2 Numidian Horse, Light Cavalry, Javelin, Elite
1 Light Cavalry, Javelin
2 Spanish Foot, Light Infantry Javelin
3 Spanish Heavy Swordsmen, Impact
3 Gallic Warriors, Medium Swordsmen, Impetuous
4 African Heavy Spearmen
1 Elephant, Mediocre
2 Numidians, Light Infantry Javelin, Elite
1 Baeleric Slingers, Light Infantry sling, Elite
2 Picked Foot, Medium Swordsmen

Breakpoint...27

Romans
Commanded by Sempronius Longus, and two others, all rated as Ordinary
6 Hastati, Principes Heavy Swordsmen, Impact
7 Allied Hastati, Principes Heavy Swordsmen, Impact, Mediocre
5 Velites, Light Infantry, Javelin
3 Triarii, Heavy Spearmen, Armor, Elite
1 Cenonani, Heavy Swordsmen (An Gallic tribe of
Cisalpine Gauls)
1 Equites, Heavy Cavalry
3 Allied Equites, Medium Cavalry
Breakpoint...   26
   

Display Conventions: When you see a word bubble like "Ouch!" "痛い" or "Auć!", this implies a disorder from missiles. Letters in parenthesis represent some value change for the specific unit. For commanders it is s for strategist, b for Brilliant, c for Competent and o for Ordinary, u for unreliable. For troops it is e for Elite, and m for Mediocre. Other abbreviations, Hvy Heavy, XB Crossbow, LB, Longbow, Jav Javelin, 2HW 2 Handed Weapons, B Bow, Kn Knight, HKn Heavy Knight, HC Heavy Cavalry, Md Medium, Sgt Sergeants, LC Light Cavalry, Chr Chariot, Cat Cataphract, Pa Pavise, LI, Light Infantry, HG Hand Gun, FKn Foot Knight, Hvy Spear, Heavy Spearmen.

Inappropriately capitalized words are used to highlight terms that are specific to the game. For example Brilliant, Competent and Ordinary have specific game values for the commanders.

"XX" implies a unit killed in that location on that turn.

Deployment:

Hannibal has just crossed the Alps and must prove himself on Italian soil. The Romans under
Sempronius have been baited to hastily come out of camp before breakfast, cross a cold river,
and fight a battle of Hannibal’s choosing.
 
The battle features a Roman army with lackluster leadership and questionable morale against
Hannibal’s cunning plan. Even the inexperienced Roman legion still proved to be a powerful
adversary that Hannibal had to defeat with his wits. Hannibal’s army contains more mounted and light troops, while his heavy foot is not as ready to meet the Romans on even terms. Hannibal placed his brother in ambush with a picked force on the flank of the Roman army.

The battle begins with the Romans facing off Hannibal’s army, the skirmish fight has already
begun, and Mago’s ambush is ready to advance.

The scenario has preset the deployment of all forces, and the game starts with the Romans having already made their first move.

The Roman right is a legion of Romans, a legion from an allied city state and supporting forces.

Sempronius takes the center with another legion of Romans, and a legion from another allied city state.  The Roman left command has two legions, and supporting cavalry.

Hannibal takes the left

His command includes all the African Spear

His right has Spanish and Gallic foot.  His younger brother Mago is hiding in a gully off board.

Rolling a one, Hannibal has two command points,  He orders his skirmishers foot forward, along with his Numidians off the board left side, and his main force, but doesn't have the points to order his Punic cavalry as well

His other commander is flush with points.  He advances quickly, as Mago is also arriving.

Mago, included with the Medium Cavalry arrives ready to attack the Roman left flank.

 Turn 2:

The Roman line steps forward


Their left flank makes adjustments to deal with the flank march.

Again, Hannibal has only 2 command points to spend.  He holds his front line, and begins to encircle the Roman Cavalry.

The Carthaginian right command also holds.

Pending resolution of the flank march battles.

Turn 3:
Roman horse turns and charges the Numdeian lights.  Their main line of foot charges, causing the Carthaginian light foot to flee as well.

The Roman left also advances.

On the far left, the Triarii, with their embedded commander, charges the Numidians, who flee.  The Triarii are emboldened, rolling up on pursuit, forcing the Carthaginian heavy horse to evade as well.

Hannibal again has a shortage of command points.  He orders his Punic Cavalry to continue to try to wrap the Roman line.  

The Carthaginian allied command also has only 1 command point.  The Gauls must charge.  The Spanish are ordered to move to support them.

One of Mago's swordsmen are defeated.  This plan is officially a bust.

From their seats high atop Mount Twix, the Roman Gods are observing the battle.

Turn 4:

The Carthaginian left flank encirclement is contained, the right flank march is mostly defeated, it is time to put pressure on Hannibal's main line.

A Roman legion is defeated, but the Spanish are being sorely pressed.

The Allied legions on the left are looking for opponents to strike at.  Their main problem is their commanded is with the Triarii, see the "Dead" marker, and if they advance, they will be out of command.


A Legion is flanked and destroyed.

Hannibal deems this is as good as it is going to get and orders his forces to attack.  He may have been right in his assessment, but the attack goes poorly.

Carthaginian cavalry goes for a wrap around attack.  But the Allied Legions are steady and hold their ground.

Turn 5:

I don't recall the exact score but I think the Carthaginians have about 18 dead to the Roman count of 10. 

The Romans have their right flank well covered.

Their left is secured as well

Hannibal forces score a win, but by now it is not enough.

We called the game with the Carthaginians at 23 of their break point of 27, the Romans were around 13 of 26. 


So what went wrong?

Firstly, Hannibal under performed.  His command point rolls were 1, 4, 1, 1, and 1.  This inhibited his commands ability to work historically.  Which was to deal with the inferior Roman cavalry first, then engage while enveloping the flank.

But part of that was my fault as well.  As soon as the die was rolled, I should have prioritized the cavalry, instead of moving the African foot and elephant.  It was not to my advantage to engage the Roman infantry sooner than necessary.

Also, I didn't remember that that most of the Carthaginian lights  were elite, which would have made a difference.

On the right flank, I think we misinterpreted the comment that the flank march is ready to advance.  Instead of arriving on turn 1, it probably meant to hold it to turn 2.  The Roman command was able to defeat the flank march in detail, then proceed to demolish the Carthaginian right command.

The center engagements with the Roman foot actually went historically.  With the Carthaginians losing.  But by then, historically, the Romans were surrounded and then retreated.  

I think the true failure was a lack of focus in defeating the Roman Cavalry on both flanks.  On the right it was due to Hannibal prioritizing his command points to that effort, and on the right, a lack of coordination with Magos flank march and the Carthaginian on board command.  Both sides had a 4 to 2 advantage in numbers, and a smattering of either armor or elite advantage as well and should have been able to pull decisive wins in the cavalry battle.