A Headless Body Production
Location: A pleasant back yard refuge
Event: Practice for Barrage
Scenario: Byzantines vs Catalan Company
Players: John Doe running the Catalan Company
Phil Gardocki running the Nikephorian Byzantines
Game System: L'Art de la Guerre, about 200 points per side.
The Forces:
Nikephorian Byzantine
Nikephoros, the Brilliant, Pumaphoros, the Brilliant and Adidasphoros, the ordinary.
2 Cataphracts, elite
2 Heavy cavalry impact, elite
2 Light Cavalry, Bow, elite
2 Light Cavalry, Bow
2 Varangian Guards, Heavy swordsmen armour 2HW, elite
6 Skutatoi, ½ Heavy spearmen ½ Bowmen
6 Light Infantry, Bows and Javelins
Breakpoint of 23
Catalan Company
The unnamed generals were Brilliant and 2 competents.
We'll call them Wingtips, Oxford, and Pumps. (we'll let the grammar joke just sit there)
2 units of crossbowmen
2 Men at Arms Heavy Knight, Impact, Elite
2 Aragonese horsemen Heavy Cavalry Impact
1 Scout, Light Infantry, Javelin
6 Almughavars, Medium Swordsmen, Impact, Elite
4 Albanian Light Horse Light Cavalry Javelin, Elite
4 Medium Cavalry Impact
Breakpoint of 21
 |
| Off in the distance, a lawn dragon peacefully enjoys the setting sun. |
The Board
The Byzantines win the initiative and elect to attack in the plains. The
Byzantines select a field, a road, and a gully. The Arabs select,
but are denied, a town, then selected two fields and two plantations. The Byzantines a road and a gully.
 |
| The Catalan deploys 4 light and 4 medium cavalry on their right. Along with a suspicious rustling in the weeds. |
 |
| Their center is a mix of crossbowmen, cavalry and knights. Their left, the dreaded Almughavars. |
 |
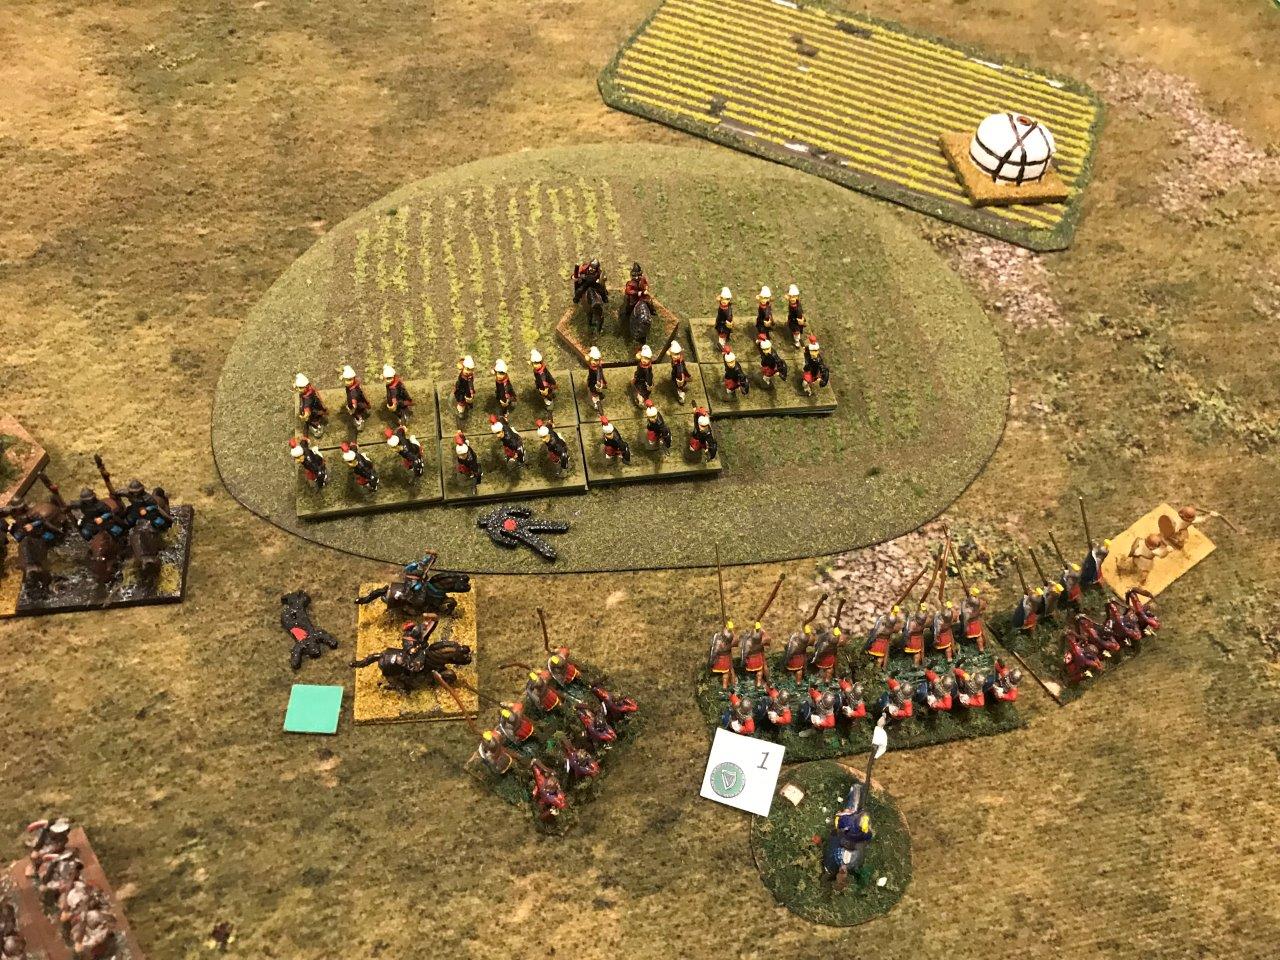
| Facing the cavalry wing is Nikephoros with 6 light horse and 2 elite heavies. |
 |
| Fresh from his 26.2 run, Pumaphoros forms up with his cataphracts in the center, flanked by Skutatoi, then Varangian Guards. |
 |
| Adidasphoros, a bit winded after his 13.1, has four Skutatoi's and 2 Psiloi. |
Turn 1:
 |
| The light begins to dim as the sun sets, leading to blurry pictures. |
 |
| Nikephoros orders touches lit! |
 |
| Pumaphoros is having command control problems, which is to be expected then you need 3 command points to advance. |
 |
| Event the exhausted Adidasphoros, the ordinary, manages to outpace the Byzantine center. |
 |
| The Catalan company maneuvers their medium horse behind their lights. |
 |
| A moderate advance for the Catalan center. |
 |
| So to, the Catalan left. |
Turn 2:
 |
| Nikephoros reforms his lines at bow range. |
 |
| Another slow advance by Pumaphoros. The lines are 4 UD apart. |
 |
| Adidasphoros also forms up at 4 UD, and looses arrows. |
 |
| The Catalan cavalry charges! The heavier Tagmata earn their pay. |
 |
| In the center, a Byzantine Psiloi is trapped and killed. Before tilting into the Varangian guards. |
 |
| Almughavars advance under a storm of arrows, and begin to pick up some hits. |
 |
| Charging from their point of honor, the Varangians engage the lead cavalry elements. The expected clash of weapons on steel and the screaming of the dead turns into an impromptu meeting of the local mercenary captains, possibly discussing the cost of surrender. |
Those of you paying attention to the numbers probably realized that the 2-1 die roll meant the elite Varangians won the fight by 1. We didn't catch this until the following turn, too late to roll back the clock.
Turn 3:
 |
| Pumaphoros pulls a hat trick of medium cavalry. |
 |
| Negotiations competed, the Aragonese opt to fight it out. The Varangians say "Fine" |
 |
| One brave Psiloi flanks the Almughavars. |
 |
| Was that lightning? Or did I finally get the flash to work? The Albanians are ordered to charge down the line, right up until bullet point 1.1 under Contact Restrictions (page 52) is pointed out. |
 |
| The Aragonese charge expecting the Petchnegs to evade, and then they would take the Tagmata in the flank. Uncharacteristically, the Petchnegs stand. Catalan heavy knights charge the Byzantine cataphracts and win both charges. |
 |
| The Almughavars charge out of the fields into the waiting spears of the Skutatoi. Who show their usual elan by losing 3 out of 4. |
The Catalan Company have 12 points towards their demoralization level of 21
The Byzantines have 13 points towards their demoralization level of 23
Turn 4:
 |
| Byzantine Tagmata surge forward, running down one light horse, and disordering another. |
The Catalan Company have 15 points towards their demoralization level of 21
The Byzantines have 13 points towards their demoralization level of 23
 |
| A cataphract is run down by iron shod hooves. |
The Catalan Company have 16 points towards their demoralization level of 21
The Byzantines have 13 points towards their demoralization level of 23
 |
| Almughavars destroy a Skutatoi. |
The Catalan Company have 10 points towards their demoralization level of 21
The Byzantines have 15 points towards their demoralization level of 23
 |
| Catalan light horse breaks off of their Tagmata opponents, leaving the crossbowmen to do the work. |
The Catalan Company have 16 points towards their demoralization level of 21
The Byzantines have 17 points towards their demoralization level of 23
 |
| Pumaphoros has had a crisis of command points these last two rounds, denying him several opportunities to encircle the knights. |
 |
| The Almughavars and another to the score. |
The Catalan Company have 16 points towards their demoralization level of 21
The Byzantines have 20 points towards their demoralization level of 23
 |
| Catalan persistence allows them to pick up two more points on the far left. |
The Catalan Company have 16 points towards their demoralization level of 21
The Byzantines have 22 points towards their demoralization level of 23
 |
| Pumaphoros gets a surplus of command points, and produces a near knight experience. |
The Catalan Company have 18 points towards their demoralization level of 21
The Byzantines have 22 points towards their demoralization level of 23
 |
| To little, to late, as the last Skutatoi falls for 23 points, a win for the Catalan Company. |
With that, it was a win for the Catalan Company, 23-18.
A clear case of persistence through adversity can overcome early defeats for an eventual win.
---------------------------------------------------------------------------------------------------------------------
Last week I mentioned I built a L’ Art de la Guerre
combat simulator.
Basically, it is a data driven macro that runs on
Excel™. It will iterate through two units fighting for 1000 battles, and
present how many times one side will destroy their opponent, and how many
bounds this will take.
After wearing out several pairs of virtual dice, have been trying to coalesce the results.
All these numbers are assuming this is two identical units fighting. Also, for ease of explanation, there has been rounding to the nearest 5 percent. More complected comparing will have to wait for a later date. I have seen the numbers, but how do I write it up in a manner that is entertaining and easy to comprehend?
Situational:
Having 2 Supports
97/3, which means the side with 2 supports will eventually destroy his opponent 97% of time.
Having 1 Support
80/20
Disordered before contact
75/25 (80/20 for 3 cohesion point units)
By Cost:
Elite, (sliding cost, 1-3 points)
70/30 (Mediocre is 30/70)
Armor (2 points)
65/35
Camel vs cavalry (1 point)
80/20
Impact and furious charge (also 1 point)
65/35
Impact, but not furious charge (1 point)
60/40
Heavy Infantry vs Medium Infantry (1 point)
60/40
2 handed weapon (1 point)
55/45
Missile support (1 point)
55/45
These numbers are more extreme then they may first
appear.
80/20 means one side wins 4 out of 5 fights.
Even missile support at 55/45, means the unit with
missile support wins 22% of their fights.
The main take away is that tactics matter more than good match-ups.
Elite matters a lot more than you would think.
Making the cost of elite slide from plus 1-3 was a good call by the game
designers to balance this out.
Armor and impact have the same advantage, and this makes sense. Armor can influence every adversarial
die roll, but is not always available on the first bound. While impact, is available only only on the first bound, can causes a disorder
where not having impact would be a tie, then the whole rest of the battle is
affected accordingly. However, impact costs 1 point, and armor costs 2. So in a straight one on one fight, impact is more cost effective, but it is also more situational. Cavalry loses impact against spear and elephants, while foot looses it against mounted. Armor is only "lost" when facing furious charge and elephants.
Heavy infantry vs medium infantry. At first, 60/40 would
seem to imply that the cost difference of 1 per element is not quite right, but if we have a theoretical line of 11 heavies vs. 12 mediums, costing 88 and 84 points. With this theoretical line
of 11 vs 12, one of the mediums on the end will have with the support, and should win, (70/30 in favor of the MI), while the remaining 10
heavies would kill 6 and lose 4. For a total of 6 to 5, a practically
even result. This does not count early penetrations down the line and subsequent flank charges. The mediums should get one early on with the hanging flank, but the heavies are likely to get a couple in the center of the line.
2 handed weapon was a disappointment, since it is my
favorite. (see Galloglaich, early Swiss) But it’s placement near the bottom makes sense. Like
armor, it can influence every adversarial die roll, but unlike armor, it only
has a real advantage 50% of the times it is used. Note that this is for like
on like battles. Having 2HW against specifically vulnerable opponents,
like spearmen, where 2HW wins ties, and the numbers go up to 66/33,
a huge advantage. The other effect of 2HW, is that it effectively
mitigates armor, a two point cost, and which is especially nice if your opponent paid for heavy
armor. But in a fair fight, when compared to impact, the 1-point
cost for this ability is not a good deal.
And there should be no surprise on the minimal effect of
missile support, except that perhaps that it is so high! Also, as
compared to impact, the 1-point cost for this ability is not a good
deal.
Then we are down to camelry vs cavalry, I think this one is a problem. The effect is totally out of proportion
to the cost. Camelry are just as good as cavalry in every situation, and
camels ignore some terrain types using both brush and sand without suffering
movement or combat penalties. The terrain benefits are enough to rate the
one-point cost differential. And then, they effectively count as
supported all the time by throwing a -1 on all adjacent cavalry. Camelry will destroy equally equipped cavalry
80% of the time. This situational combat bonus is next to none in
value. And in my opinion, it is too high. To just match medium
camelry, cavalry must be both heavy and elite, two upgrades, costing 4 points.
How effective were camels when involved in mounted
combat? Historically I can only think of one, Byzantines attacking a wall
of unmounted camels. The Byzantines dismounted and slaughtered the camels
on foot. I don’t know of any others. But if camels were this
effective, then why didn’t the camel become the dominant riding animal instead
of the horse?
For now, the only mitigation for camelry is that they
only exist in numbers in a few lists, and in lists where they exist in small
numbers, they are as much a hazard to friend and foe alike. I think a
resolution would be to either remove the cavalry penalty or raise the cost of
the camels. Raising the cost would have the effect of they will never be seen again so I am thinking along the lines of canceling impact or javelin
bonus of cavalry. Impact because the horses are hesitant to approach the
strange beasts, and javelins because their mounts became unsteady.
That’s all from the soap box. Let the min-maxing
begin!