We are the lunatic fringe (as in Ancients Miniature Wargamers), of a subset (as in Miniature Wargamers), of a fragment (Wargamers), of a minority (Gamers) of society as a whole.
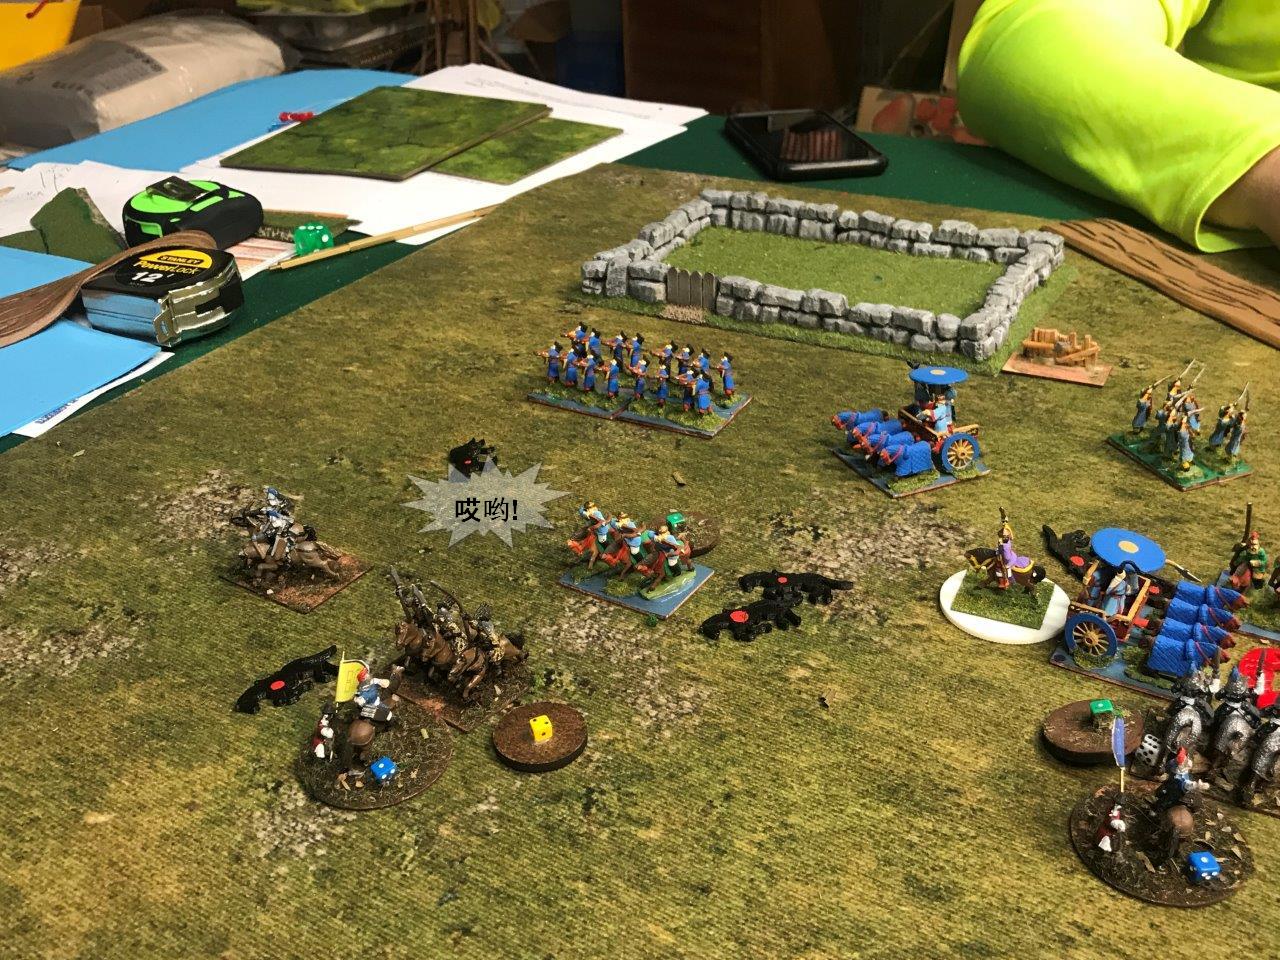
Venue: An Undisclosed Basement Event: Playing a game for the camera Players: Phil Gardocki running Korean Steve Turn running Warring States Chinese Game System: L'Art de la Guerre, 15mm, 200 points per side
The Forces: Warring States Chinese (list 80) Han Xin, Brilliant, Wu Qi Brilliant and Xiang Yu, Competent* 4 Heavy Chariots, Impact, Elite 2 Heavy Cavalry 2 Medium Cavalry, Crossbow 4 Light Horse, Bow 2 Crossbowmen 5 Heavy Swordsmen, 2HW 1 Heavy Swordsmen, 2HW, Mediocre Breakpoint of 21 Koryo Korean (list 212) The Koreans are commanded by Kim-Lar-Re, the Competent, his brother Kim-Dar-El, the Competent, and his other brother Kim-Dar-El, also Competent.2 Guardsmen, Heavy Cavalry Impact, Elite 2 Horsemen, Heavy Cavalry Impact, Ordinary 2 Militia Horsemen, Medium Cavalry Impact, Mediocre. 6 Spearmen, 1/2 Heavy Spearmen, 1/2 Crossbow 1 Cataphract, Elite 2 Light Cavalry, Bow 2 War Wagons, Crossbow 1 Light Infantry, Bow 2 Guardsmen, Crossbow, Pavise, Elite Breakpoint of 21
The Board: The Chinese win the initiative and elect to attack in the plains. Fortune favors the inscrutable, as most of the terrain falls on the Chinese side of the board.
The Chinese right flank is anchored to a Plantation. What secrets lurk there?
The Chinese left is anchored to a plowed hill.
Note on annotation. Letters in parenthesis represent some value change
for the specific unit. For commanders it is b for Brilliant, c for
Competent and o for Ordinary. For troops it is e for Elite, and m for
Mediocre. Other abbreviations, Hvy Heavy, XB Crossbow, LB, Longbow, Jav
Javelin, 2HW 2 Handed Weapons, B Bow, Kn Knight, HC Heavy Cavalry, Md
Medium, Sgt Sergeants, LC Light Cavalry, Chr Chariot, Cat Cataphract, Pa Pavise.
Kim-Lar-Re deploys on the left with all the cavalry.
Kim-Dar-El is in the center.
The other brother Kim-Dar-El is with the War Wagons, holding the flank.
My thoughts are this. The cavalry command does not want to face the Heavy Chariots. And deployed in an area they were not likely to be. Let the enemy advance in the center, and try to flank with the cavalry on the left.
The right flank can be held by the War Wagons. That command also has a couple of Guards with Cross Bows, I will attempt to get them in the field and set up a missile platform harassing the enemy left.
Turn 1:
One command of chariots and cavalry advance on the Korean Heavy Infantry. The other command looks to take up position with them. The Chinese Heavy Infantry does not move.
Their light horse approaches the Korean Guards. Looks like the plan to take the field is a bust.
But the other part of the plan seems in play. The lance armed cavalry takes up position to flank the chariots.
The main battle line advances and releases their bolts to good effect.
The flank of the main battle line is secured. The Chinese horse have no chance against the War Wagons. The Guardsmen have nothing to fear from Light Horse, and expand and prepare to advance down the road.
Turn 2:
The Chinese heavy foot advance, sans their new recruits. This will make flanking the chariots difficult.
Especially since they decided not to play in this field and begin to retreat.
The cavalry advances. The numbers are not too bad against Heavy Swordsmen.
Korean Foot advance and release another volley. And score twice again.
The guardsmen advance and also score.
And what are the odds of cavalry against heavy swordsmen, 2HW? Not as good as I would have thought. Heavy Cavalry Impact Elite beat the Heavy Swordsmen only 40% of the time, 77% if it has support Heavy Cavalry Impact Ordinary beat the Heavy Swordsmen only 28% of the time. Medium Cavalry Impact Mediocre beat the Heavy Swordsmen only 13% of the time.
Turn 3:
The swordsmen advance a bit, their mounted forces racing behind them to their right flank
They also are covering the retread of their disordered chariots, at a cost.
Korean Guardsmen follow as quickly as they can the retreating lights.
This is a bit complected. Lights split to reveal the ambush, and take a shot. Elite lancers line up an overlap charge, while their ordinary lancers take a flank charge position.
Protected by their spearmen, the Korean archers release waves of bolts.
The Guardsmen are in the field, but the Chinese have retreated to the point where that is not relevant anymore.
Turn 4:
To avoid a coordinated charge of cavalry and foot, the Chinese attack with their undisordered swordsmen. Totally surprising the Koreans, who fall back!
Meanwhile, the chariots are now in theater. Charging off the lights, and protecting the flank of their foot with a ZOC.
There is too much horse on the Chinese right, so some of their mounted redivert to the left.
This looks complected, but only a little.
1) Disordered LH retreats from the plantation
2) An ordinary lancer charges a chariot, and loses badly.
3) Once engaged, the ZOC of the chariot is no longer in effect, allowing a flank charge on the Chinese Heavy Swordsmen.
Bringing up the Heavy Infantry to line up with their horse.
Guardsmen continue to put pressure on the Chinese lights.
A promising start for the Koreans, 7-2
Turn 5:
Quality begins to show. Archery from the plantation disorders the largely untrained Korean lancers.
Elite Chariots trample another lancer. But a Chinese Heavy Swordsmen also is destroyed.
Having been decimated by many salvos of crossbow the Chinese swordsmen charge.
Their lights brought forward to continue to screen their heavier units.
Bringing the score to a virtual tie of 8-7
Kim-Lar-Re has a too much to do, and note enough wit to do it. He orders his elite lancers to engage the Chariots and the Chinese Heavy Horse, losing both actions.
But his last order continues the charge of lancers down the infantry line. One falls, another pursuit. On the other side, yet a third is destroyed.
The Guradsmen (Crossbow, Pavise, elite), continue to put pressure on the Chinese left. The Chinese chariotry have almost completed rallying from their earlier disorder.
Bringing the score to 10-All
Turn 6:
The Korean cavalry is all but done. Except for a troop running down the line, it has accomplished nothing.
Despite the Korean advantage with flank support and numbers, the 2 Handed Swords of the Chinese are holding back the mediocre spear of the Koreans.
Having waited for the right moment to strike, a charge on the Guardsmen by horse troops, with chariots to follow.
The Korean army is a shooting army. Once in melee range it's weaknesses are apparent. For the first time, the Chinese are winning, 15-12
Kim-Lar-Re orders a general retreat of the remaining mounted forces.
Kim-Dar-El advances behind the Chinese line. Crossbowmen barely screened by the last vestiges of Chinese light horse.
A guardsmen falls, but the War Wagons have rumbled into place again.
The Chinese advantage grows, 16-12
Turn 7:
Sensing the end is near, they Chinese Crossbowmen leave their Plantation to pursue the retreating Korean horse.
Surrounding the flank charging Korean Cavalry in time to save the last Chinese swordsmen. Emboldened, they destroy their Korean tormentors.
I didn't catch this till later. The charge on the Korean horse on the flank and the rear was not legal. The Chariots crossed the ZOC of the Cataphracts to get there, and so could not have supported the charge.
And it wouldn't have mattered. Instead of 5 to -1 the fight would have been 3 to -1 (the general would have switched to the cavalry) And he won the dice off by +1, so still was 4 over and enough to kill the Cavalry.
A bit of a back and forth, that only a Brilliant Commander can achieve. Instead of conforming with his cavalry, it was pulled back, providing enough space for a Furious chariot charge, with support. The second Guardsmen falls.
Which gives the Chinese the boost they need to win the game, 21-13
Just how did the Koreans squander their advantage here. Up by 5 at one point, only to lose by 8?
On the right the Guardsmen, over exuberant and facing lights, left its safe area, and out ran its supports (the war wagons) to be swatted by superior mounted forces. They got 2 points for lights, and lost 4.
In the center was a clear victory. Killing 8 points of foot, disordering 3 mounted for 11. But it cost them 7 to do it. They even had an early advantage there, forcing a chariot command to retire for most of the game. But when it came back, it was able to swat the right side command of guardsmen. So while the focused crossbow yielded an advantage, it was not one that was exploitable.
The mounted command on the left was where the game was lost. In an effort to support the center command, they lost 6 units. Some to sacrificial charges, others to a shortage of command points that resulted in units staying in range when they shouldn't.
But that is the nature of this army. Only 3 command points means you don't try anything fancy.
On the Chinese side, you could say they pitted their heavy foot on heavy foot, and while that was happening, they gained local superiority on the other two battles for the win. Patience and superior command control won out over exuberance.
* There are no jokes with the Chinese names, you can stop trying to phonetic them out.
Venue: Online using Table Top Simulator Event: Tuesday afternoon Players: Tim "Madaxeman" Porter playing Camillan Roman Phil "The Other Bloke" Gardocki playing Pyrrhic Game System: L'Art de la Guerre, 200 points per side, over a virtual table, separated by 3000 miles of fiber optic cable. Theme: Classical
The Event of the Year!
This game is against Tim Porter, the Madaxeman, himself! So there are two different reports of this game from both sides of the virtual table, for his YouTube video, click here.
I first heard about The Mad Axe Man in mid July, 2016. I was invited for a weekend at Walt Leech's, whose man cave is a war gamers heaven. I was greeted as the "American Mad Axe Man". I had no idea who he was, but realized that I had a fan base. Which was both frightening and humbling. At that time, I had about 40 Ancients related battle reports to my credit, about a dozen for L'Art de la Guerre. I had been doing writing battle reports since at least 2011, and have 80 for other AAR's in other, themed blogs*. 3 games went by, followed by a long drive home, some new pictures to post and I forgot all about him.
Over the next year or so, at tournaments, I would give my opponents a spiel about what I was doing, and would they mind if I took pictures during the game, and littering the board with dead markers, and giving them the choice to opt out, because it is their game too, and I didn't want to take the fun out of it for them.
To date, none have, but a few wish to be anonymous for reasons of their own.
And every once in a while, one would say, "Oh, like Madaxeman".
Well you only have to kick me 4 or 5 times before I get a clue and I looked up his web site.
The man is nuts. Without exaggeration, he has been doing this for decades. It takes me 3-4 hours to do a single battle report, adding flavor text, sometimes telling a story, so I limit my postings to one a week, to give everyone a chance to read it before posting another one. Tim will put up 5 at once. With word bubble conversations between the figures, interleaved with relevant videos, post action commentary by Hannibal and Scipio, on a web site with all kinds of support for the game.
In short, he was better at this than I, by a lot, he puts the time in and it shows.
We started a small correspondence, comparing "how to's". Mostly for my benefit. And it was in great anticipation when I heard he was coming to Cold Wars, 2020, and I thought we can play a game, and the viewers will get to see both perspectives. This has only happened to me once before, in a Flames of War Tournament. It's cool. But it was not to be. I bowed to pressure about the plague spreading across the land and opted out.
Both Tim and I have a number of games under our belts using Table Top Simulator so the we have over come the wonkiness of the interface and played a game last week.
Enjoy.
The Forces:
Pyrrhic, list 44 Led by the Pyrrhus the brilliant, Darrylious, the Brilliant and Darrylious, the Competent 2 Xystophoroi, Heavy Cavalry, Impact, Elite 4 Greek Horsemen, Medium Cavalry 2 Tarentine, Light Cavalry,Javelin 2 Hoplites, Heavy Spearmen 2 Macedonians, Pikemen, Mediocre 2 Hypaspist, Pikemen, Elite 1 Elephant 2 Rhodians, Sling 2 Samnite Mercenaries, Medium Swordsmen, Impact, Elite 2 Bruttain Mercenaries, Medium Swordsmen 2 Bowmen, Light Infantry, Bows Breakpoint of 23
Camillan Roman, list 52 3 Commanders, two Competent, one Ordinary and Allied,
4 Hastati, Heavy Swordsmen, Impact, Armor
1 Triarii, Heavy Spearmen, Armor, Elite
4 Ascensci, Heavy Spearmen, Mediocre
2 Principes, Heavy Spearmen
4 Velites, Light Infantry Javelin
5 Equites, Medium Cavalry, 2 Elite
5 Samnites, Medium Swordsmen, Impact Breakpoint of 26
A note on annotation. Letters in parenthesis represent some value change for the specific unit. For commanders it is b for Brilliant, c for Competent and o for Ordinary. For troops it is e for Elite, and m for Mediocre. Other abbreviations, Hvy Heavy, HSp Heavy Spearmen, MSp Medium Spearmen, HSw Heavy Swordsmen, MSw Medium Swordsmen, XB Crossbow, LB, Longbow, Jav Javelin, 2HW 2 Handed Weapons, B Bow, Kn Knight, HC Heavy Cavalry, Md Medium, Sgt Sergeants, LC Light Cavalry, Pk Pikemen.
XX refers to newly dead. Random "Ouch!" is a missile hit.
The Board: Pyrrhic wins the initiative and elects to attack in the plains.
With a perceived advantage in cavalry, Pyrrhus goes for a minimum of terrain, a field and a road. The Romans place two plantations and another field. Their placement rolls are perfect, as the Romans fit perfectly between the plantations.
There are a lot more Romans then expected. Also, their cavalry command is supported by two spear armed Principes, which is a problem
The original plan was to dismiss the Roman Cavalry, then attack their foot with my cavalry nibbling on the edge. That plan is out the window.
New plan. Distract the Roman cavalry and left flank infantry and hammer through the center. From my opening moves, it does not look much different
I have never run Pyrrhic before. It is interesting in that it has a lot of choices.
One organizational mistake, my main battle line is 7 elements wide. So in addition to taking an additional command point for the elephant moving short, it also takes another additional point for being too wide.
I do expect the main line to do well. I have elite Hypaspists next to the elephant, then ordinary pike, which should do well against Roman Legionnaires. The Hoplites on the ends are more for providing flank protection then attacking, as they can actually turn and move on one command point.
The Romans are not impressed. They have more Samnites, which are all Impact, where as mine are only half Impact. It looks like the Romans are going to attack right, and hold left.
Turn 2:
It's a slow crawl across the battle field, except for the cavalry, which is facing nought but heavy spearmen at the moment
For only having 2 Competent commanders, the Romans have a lot of actions. The Samnites clash, the Roman Allied commander avoids the Pyrrhus's elite impacts, relegating them to "support" status. But muffs the die roll for combat, taking two levels of disorder.
Meanwhile the Roman Legionnaires, who have noticed how sloppy Pyrrhus's center command is advancing, decide to show them how it is done, with hob nailed sandals, they advance at a quick march.
On the Roman right, the Ascensci handle cavalry as they have been trained. They advance and don't stop. Flanking Pyrrhus's elite Xystrophoroi, daring them to charge.
Turn 3:
Changing the view to overhead. Which is how I normally play, but forgot to adjust it earlier. From this angle, the elements are much easier to adjust with the user interface.
A Roman Samnite is down, the remaining Pyrrhic Samnites advance for a charge next turn. In the center the main battle line charges. One Velite evades before the elite Hypaspist, but the other stands before the elephant. +3 to zero, the Velites are trampled into the mud, pursued by Hypaspist and pachyderm.
That is a bit too much description to describe what amounts to the destruction of a light infantry, but it set up the counter punch by the Roman Hastati on the left side of the Pyrrhic main battle line, which now has a gap and leads the right wing by about a blond hair.
The Xystophoroi charge. Better now, then later as the Romans will charge with flank advantage.
Normally, Heavy Cavalry charging Heavy Spearmen is not a good idea, but when the Cavalry is elite and the spearmen mediocre, its not so bad. The Cavalry will eventually win 57% of the combats.
In a normal Heavy Cavalry to Heavy Spearmen, the odds of the cavalry winning is just 19%.
Pyrrhus made one error, instead of rallying the Tarentines, he should have disengaged the Greek Cavalry.
The Romans keep up the pressure There are gaps in the Pyrrhic army to exploit, so attacks are available with the benefit of support. The Pyrrhic main battle line suffers a couple of disorders, while two of Pyrrhic cavalry are dispersed.
Turn 4:
Pyrrhus is down a few points. It is time for the main attack. Elite Hypaspists and Elephants charge, and are both rebuffed by Roman Hastati and Triarii. The only saving grace is the destruction of Samnite Cavalry by Samnite swordsmen.
I remembered to disengage the Greek Cavalry, and the Xystophoroi this time. But committed a rules violation, where another of the Greek Cavalry disengaged against their Roman Medium Cavalry counterparts. Which is not allowed.
The score is Rome 11 of 26 to Pyrrhic 14 of 23
The main battlelines continue to hack at each other. Another Roman Samnite unit is destroyed, countered by the loss of a Greek Cavalry.
More importantly, the Romans have turned the Pyrrhic main battle line.
The score is Rome 13 of 26 to Pyrrhic 15 of 23
Turn 5:
Desperate measures require the brothers Darrylious to lead from the front. The Samnite on Samnite fight has him facing a flank charged unit, but a 1-6 die roll is to the Roman advantage, with Darrylious barely avoiding losing a limb for his efforts. The other brother Darrylious is more successful, leading his Hypaspist to victory over the Triarii.
But his bravery cost him, as he didn't have enough command points to turn his pike to face the oncoming Roman charge, which, in the end, cost him the battle.
The score is Rome 17 of 26 to Pyrrhic 16 of 23
The Romans play cautiously, trying to avoid defeat from the jaws of victory. One Hypaspist is destroyed, disordering the lights behind them. Their Ascenci flank charge Greek Pike, barely scoring a hit. Greek Hoplites are taken in the rear, and routed through by the fleeing Xystophoroi.
With that, the final score is Rome 18, Pyrrhus 23.
So what went wrong?
Throwing out the original plan was a good idea, however, the cavalry command still committed to combat. They should have postured and parsed off a sizable chunk of the Roman army and let the main battle line go to work.
On the left, my Samnites were out tacticed, as Tim was good at selectively avoiding the two elite impact units, only to be defeated by drastically unfavorable dice on his part. He also secured a tactical advantage and had favorable dice on the main battle line. But he would not have turned it's flank had my cavalry played the game they should have.
So without the defeat of the Pyrrhic cavalry, the game would have run longer, with the Pyrrhic Samnites turning the Roman Hastati flank, the game would have been much closer.
For a post game discussion there is another YouTube video
Venue: Real figures, across 3000 miles of fiber optics Players: Phil Gardocki running Anglo Irish (pre 1300) Tommy Worden running 100 Years War French Game System: L'Art de la Guerre, 15mm 200 points per side. Theme: Just passing time.
The Forces:
The gleeking rump-fed mildewed-eared Anglo Irish, circa 1299 AD
Larry (Competent), his brother Darryl (Competent) and his other brother Darryl (also Competent)
4 Longbowmen, stakes
2 Javelinmen
4 Galloglaich, Heavy Swordsmen, 2HW, Elite
2 Irish Lords, Heavy Swordsmen, Armor, Elite
5 Kerns, Light Infantry, Javelins
4 Irish Nobles, Heavy Cavalry
2 Irish Cavalry, Light Cavalry, Javelins
Breakpoint of 23
100 Years War French, led by Larry d'Arc (Brilliant), Darrel Bretangne (Competent) and Darrel Berri (Ordinary)
2 Mercinaries, Heavy Knights, Impact 4 Nobles Heavy Knights, Impetuous 6 Light Infantry, Crossbow 2 Genoese Crossbowmen, Pavise, Elite 1 Brigands, Heavy Swordsmen, 2HW, Mediocre 2 Pavisiers, Heavy Spearmen, Pavise 2 Heavy Spearmen 2 Foot Knights, Elite Breakpoint of 22
Deployment:
The French are at the top. They win the initiative and elect to attack in the plains. The Anglo-Irish terrain picks are Field, Gully, Plantation and Fielded hill. The French pick a small Plantation and a road. The small plantation was removed during adjustments. All the other pieces of terrain are on the Anglo-Irish side of the board.
Way off in the corner of the board, away from everything else on the board, is the French Camp (f)
The French right is the point of honor, and the Chevalier's dominate the position. Knights on foot to their left are preparing for the climb up the hill, their flanks covered by Genoese Crossbowmen.
Larry's command is mostly skirmishers, and is prepared to play games with the flower of French Knighthood. In the Gully, his longbowmen await.
Darryl commands the center. Elite heavy foot all. But against mounted heavy knights this is a losing game. On impact, the knights are 2-1 and have furious charge. Their superior armor canceling the Galloglaich 2 handed weapons.
So what are the odds of Knights vs Heavy Swordsmen?
With no specials, Heavy Knight Impact vs Heavy Swords will win the engagement 73% of the time in 3.6 combat rounds.
But these swordsmen are all elite, and some have 2HW
Against Heavy Swordsmen 2hw elite, the knights win 42% of the fights in an average of 3.3 rounds. Upgrade the knights to elite, and the odds reverse, knights winning 58% in 4.2 rounds.
Against the Heavy Swordsmen Armor elite, the knights win 58% of the fight in an average of 4.2 rounds. Elite knights win 83% in 4 rounds.
Knights arriving disordered or if the foot units have support, and the odds get far worse. Knights win in 14.5% of the battles.
Darryl's troops form up mostly on the fielded hill.
Turn 1:
The French Knights double march forward. But their middle command, with all their heavy foot holds back.
The Commander was placed with the heavy spearmen, and used his command point to join the foot knights. The other point was spent pushing the LI Crossbow forward to screen the knights.
Larry reveals his ambush. Two files of Longbowmen emerge from the gully, bows strung, they approach and loose arrows.
An ungarrisoned camp is just way too much temptation. Larry goes for it. This is not totally without a cost, as his other troops will eventually get out of command range. But for now, that is OK.
Darryl's forces break the crest of the hill. Exchanging yard shafts against bolts.
Unpictured here is the main line of Galloglaich and Irish Lords, which double march backwards;
Turn 2:
French LI race to try to screen their right flank knights.
For the flower of French chivalry is in full charge.
Longbows to the left of them, longbows to the right of them
Volleyed and thundered;
Stormed at with shot and shell,
Boldly they rode and well,
Into the jaws of Death,
Into the mouth of hell
Rode the six hundred.
Irish light horse chase off French light foot.
The same on the right. A knight troop is dispersed by yard long shafts of the Welsh yeomanry.
Genoese crossbowmen receive Irish Nobles, and destroy one.
At the tree of woe, the score is 4-2
Turn 3:
The view from the Fujifilm blimp. You can tell by how green the image is.
A really dated pair of references there.
Ignoring sheaf's of arrows, the French thunder on.
Their foot knights show their endurance by uninterrupted marching towards the hill.
The camp calls for aid, and the foot spearmen answer.
Horns sound warning of a monster on the loose.
Cat to 1/100 scale.
Darryl utters comforting words.
Larry is almost at the camp
Mounted Irish Nobles conform on the Genoese, an additional command point brings the Light Horse in for support as well. Then a 5-1 die roll takes the Genoese out.
Turn 4:
The final charge. A Kern is caught and dispersed, the only victory for the Chevalier's this day
The Kerns position was that it couldn't interpenetrate the Galloglaich, as the Camp behind it is impassable, and couldn't divert, as it would take more than a UD to do so.
The foot knights set up for their charge. Watching one of their Lights skedaddle before the Irish Horse.
At the top of the bottom of the 4th, the score is 12-4
As if it was not bad enough, the ill-nurtured horse-drench's Irish charge the brave Chevalier's on the right, while the farting like a sheep dog Welsh charge off the hill into the Chevalier's left. Reducing Larry d'Arc's command to 1.
Adding insult to injury, the French left the door open to their camp.
The French Foot Knights are the last major force in the field, and are threatened by Darryl's victorious noblemen.
Turn 5:
I offered a mercy kill the game at this point, but blood has been spilt, and blood must answer for it!
Irish Light Horse, watching the spectacle instead of what they were doing, are shot away by French Crossbows.
Welsh Longbow seeing their end is near, flee the field before the French Foot Knights.
Honor has been recovered, the French retreat from their losses.