Tuesday, November 10, 2020

A Gerrymandering of Germans

A Headless Body Production

Venue: Virtual Table via Table Top Simulator
Players: Phil Gardocki running Anglo Irish (pre 1300)
                Dave Ray running Feudal Germans
Game System: L'Art de la Guerre, 15mm 200 points per side.
Theme: A rerun of last weeks game. Since it came to an such an exciting 3-2 conclusion.
 
The Forces:
The pribbling hag-born whey-faced, Anglo Irish, circa 1299 AD
Led by the warped boil-brained pumpion, Larry (Competent), his brother, the adulterate pox-marked foot-licker, Darryl (also Competent) and his other brother, the bawdy reeling-ripe imbossed carbunkle, Darryl (also-also, if only barely, Competent)
4 Longbowmen, stakes
2 Javelinmen
4 Galloglaich, Heavy Swordsmen, 2HW, Elite
2 Irish Lords, Heavy Swordsmen, Armor, Elite
5 Kerns, Light Infantry, Javelins
4 Irish Nobles, Heavy Cavalry
2 Irish Cavalry, Light Cavalry, Javelins
Breakpoint of 23
 
The Feudal Germans, led by Heinrich (Brilliant), Wulff (Competent) and Luitpold (Ordinary)
6 Medium Knights, Impact, 2 elite
2 Sergeants, Heavy Cavalry, Impact
2 Hungarians, Light Cavalry, Bow
2 Mounted Crossbowmen, Light Cavalry, Crossbow
2 Low Countries Pike Mediocre
2 Mercenaries, Heavy Swordsmen, Armor, 2HW
2 Heavy Spearmen
2 Crossbowmen
2 Light Infantry, Crossbow
Breakpoint of 22

Deployment:

The Anglo-Irish win the initiative and elect to defend in the mountains.

The Germans are at the top of the screen.

Note on annotation. Letters in parenthesis represent some value change for the specific unit. For commanders it is b for Brilliant, c for Competent and o for Ordinary. For troops it is e for Elite, and m for Mediocre. Other abbreviations, Hvy Heavy, XB Crossbow, LB, Longbow, Jav Javelin, 2HW 2 Handed Weapons, B Bow, Kn Knight, HC Heavy Cavalry, Md Medium, Sgt Sergeants, LC Light Cavalry

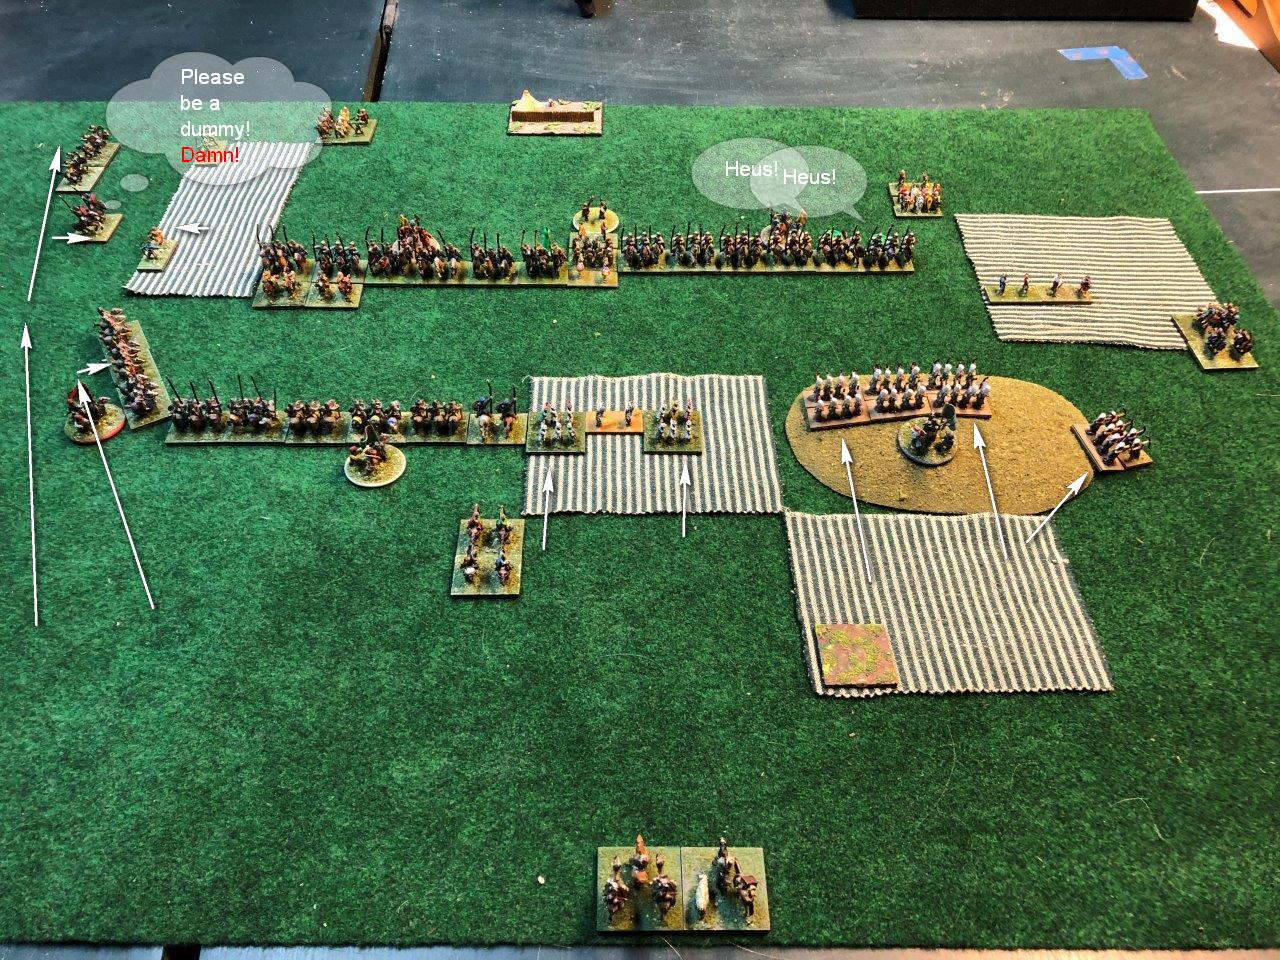
The German right wing is a solid force of heavy infantry, with pike, spear and 2 handed weapons.  Supported by two kiels of crossbowmen.  On their left are dismounted knights, as Heavy Swordsmen, Armored.  Mounted knights are on their far left, ready to ride down any hapless Irish cavalry foolish enough to tilt with them.

Facing the German foot is a smaller, but more elite group of men.  Led by Darryl, the brother of Larry, The Galloglaich are swarthy in appearance, compensating for their inadequate manhoods with outsized weaponry.  To their right is Larry, with a mix of longbow, heavy cavalry and lights.

But what of the other brother Darryl?

Turn 1:

The Germans are fearless and advance as quickly as ground will allow.  Darryl is known for his mercurial nature, and he may never show up.

Or not.  That is the problem with incompetence, they sometimes show up early as well as late.  Dust on the horizon reveals that the flank march will not only show up early, but in greater numbers than expected.  Darryl mimes "Yes" and pushes his forces forward.  Larry throws away the plan of just sitting on the hill and shooting, and descents for some archery practice.

Ambushes are revealed to be just lights.  One takes up a position  behind a hastily constructed wall of stick.  The other advances to support position for the Galloglaich.

Turn 2:

Wulff's command of knights races down the road to intercept.  But  Luitpold rolls a 1 for command points and has limited options.  He turns one XB unit to face the flank march, and advances his main line. 
The thought here is to engage the Galloglaich, even though flanked, and do as much damage as possible, while Wulff's knights destroy the rest of the flankers.
The other brother Darryl arrives with an odd mix of troops.  Longbow, Javelinmen, Heavy and Light Cavalry, supported by Kerns.

Darryl advances the Galloglaich to charge reach.  He is hoping Larry's Long Bow and Heavy Horse can distract the dismounted knights and prevent his flank from being overlapped.

Turn 3:

Luitpold continues with his plan to engage and flank the Galloglaich right.  But fortune is not with him, as his troops lose 4 of 6 fights.  Two of them by virtue of 2HW beats spear in a tie.

One piece of luck.  Wulff's Mounted Sergeants, win their race down the road, and successfully charge the Welsh Archers before the stakes could be laid.

The score is Irish with 5 lost to the Germans 7.

Turn 4:

What happened to the bottom of the 3rd?  Copy paste error.  It went missing.  So the arrows reflect moves of both the bottom of the third and the top of the fourth.

At the top of the board, German Sergeants eliminate a unit of Longbow, then ignoring the others, turn left and charge the Irish Nobel Heavy Cavalry.  Who turn tail and run like the marrowless cowards they are. 

Similarly, the other Irish Noble Cavalry finish off their German Crossbowmen. 

The fight of the mainline of heavy foot was brutal and short, 5 German units are destroyed in exchange for the Irish Lords on the far right.

And just that quick the score is now Irish lost 8 (of 23) to the Germans losing 17 (of 22).

In L'Art de la Guerre, the sometimes arrives a problem where you totally blow away a command, but then what?  Oft times that command is out of the game.  Do you dribble it into other combats, or go for rallying the damaged and proceed in formation.

This is a difference between a game and reality.  In reality, the line of Galloglaich would start to wheel into the Germans, engaging the dismounted knights on their right, and the mounted knights on the left.

But the other reality is the Irish only need 5 points to win.  And can afford a couple of unfavorable exchanges to get it.

On the left, Irish Horse charge the Sergeants.  They have support, and the Sergeants are disordered.  But fortune favors the Sergeants this round and they hold their ground while their knights continue to advance.

The Galloglaich Clan Ramsay conforms right.  They only need to hold for two bounds as Irish Javelinmen are set up for a flank charge! Clan Ramsay is Heavy Sword, 2HW, Elite against dismounted knight, Heavy Sword, Armored, Elite, Disordered.  Clan Ramsay makes a devastating attack causing 2 points of damage!  It looks like they will more than hold!

Odds Interlude:

The numbers are against the Galloglaich actually winning this fight.  Their goal is to just hold on, and they got very lucky.

The odds are 65/35 in favor of the knights, here, winning in an average of 5 combat rounds.


The score is now Irish lost 8 (of 23) to the Germans losing 19 (of 22).

Turn 5:

Vas ist los?  What is this?  Is the narrator confused? (verwirrt?) Why are the Germans suddenly screaming in French?

I stopped editing on turn 4, and came back later thinking this was another game. 

Knights advance on a longbow unit, and are disordered by yard long shafts of arrows.  Other knights approach Irish Heavy Cavalry to support their beleaguered Sergeants, who seem to have things well in hand, with a tie and a win.

In the center, GerFranic dismounted knights rally! The Galloglaich clan Ramsay failing to find any more chinks in their armor.  But the GerFranic situation is some what dire, down 9 points in the game, and their shortage in command points has left their positions vulnerable.

The Anglo-Irish exploit several targets of opportunity.  On the far left, Darryl advances to the flank of the Sergeants.  Clan O'Lyre charges the flank of an Heavy Spearmen, scoring 3 hits.  Javelinmen flank charge the dismounted knights in the center, poughing them under with both wit, woad, and wiles.

The game was down to 1 point, and it was in the upper right.  Irish Nobles catch an enemy light horse in the rear.  And roll a 1-6 and tie.  (Alcohol may have been involved)

Turn 6:

The end was not in doubt, but the GerFrancic's are not going down without a fight.

The Sergeants defeat their foe, while a knight blindsides a longbow.  Light horse swarm the stalled Heavy Horse, only to have the dies reverse 6-1 for a total defeat.  The final score is 22-13, a win for the Anglo-Irish!

So what went wrong?  Larry's command, the one on the right, was initially broken up into too many pieces.  The thought was to try to prevent flanking on that side, but with the terrain, that could have been handled with an LI and an LC.  Allowing the HC to operate together.  When running a command with that many parts (bowmen, horse, lights) command control is a problem.  Having only a competent means not all the parts will be movable in a turn.  Anything that can be done to mitagate this is crucial.

The Flank March came as good as you could want.  But it's ultimate goal was not achieved, the camp!  Once again, too little force was spent on achieving the camp, and in the end, it failed.  This wasn't covered much in the AAR, becuase most of it was in the top of the board, and under the graphics of Table Top Simulator.  The LH cam on, and was in charge reach of the camp on turn 2.  But the Germans got a knight to throw a ZOC in the way, and made the camp inviolate.  Command points were at a premium, and the Irish LH never got into the fight.  The end result was the knight drove off the LH, turned, and took a Longbow in the flank.  

The secondary mission of the flank march was a total success.  Javelinmen eventually making 3 flank charges that caused cohesion lost of the enemy main battle line.  Coupled with good dice, and the Germans just collapsed.

The third mission of the flank march was also a success, but had a price.  To cause the Germans to spend command points diverting a command to deal with it, when it could have been flanking my main battle line.  Despite my best efforts, only 1 crossbow was killed, 1 disordered, and a Heavy Horse (Sergeants) had been disordered, at a cost of a Heavy Horse and a disordered LI.  If the game had gone another turn, the mounted knights had easy prey available to them. 

Thursday, November 5, 2020

A Krap Ton of Knights

A Headless Body Production

Venue: Virtual Table via Table Top Simulator
Players: Phil Gardocki running Anglo Irish (pre 1300)
               David Ray running Feudal German
Game System: L'Art de la Guerre, 200 points per side.
Theme: Just passing time.
 
The Forces:
The lily-liver'd Anglo Irish, circa 1299 AD
Led by Larry (Competent), his brother Darryl (Competent) and his other brother Darryl (also Competent)
4 Longbowmen, stakes
2 Javelinmen
4 Galloglaich, Heavy Swordsmen, 2HW, Elite
2 Irish Lords, Heavy Swordsmen, Armor, Elite
5 Kerns, Light Infantry, Javelins
4 Irish Nobles, Heavy Cavalry
2 Irish Cavalry, Light Cavalry, Javelins
Breakpoint of 23
 
The Feudal Germans, led by Heinrich (Brilliant), Wulff (Competent) and Luitpold (Ordinary)
6 Medium Knights, Impact, 2 elite
2 Sergeants, Heavy Cavalry, Impact
2 Hungarians, Light Cavalry, Bow
2 Mounted Crossbowmen, Light Cavalry, Crossbow
2 Low Countries Pike Mediocre
2 Mercenaries, Heavy Swordsmen, Armor, 2HW
2 Heavy Spearmen
2 Crossbowmen
2 Light Infantry, Crossbow
Breakpoint of 22

Deployment:

The Feudal Germans are at the top. The Anglo-Irish Heavy Foot find a comfort zone between two fields, which is invested with their Longbow and Javelinmen. On the far left, is Larry with some horse troops. If the Germans deploy a Knight command over there, then he should be able to tie them up for a while.
I was hoping to be only facing only one knight command on the left, which I can play evade games with for a while, but two is just handing Dave points. 
 
From Dave's point of view, he probably was hoping for more things to kill on that side of the board.
 
Turn 1:

It's the von Schlieffen plan all over again The strong German right wing goes through Belgium without delay.

Larry's plan is delay, delay delay. Keep those knights occupied. He pulls out the longbow from the field. They have stakes. His light horse is withdrawn because they are greatly out numbered. He'll need them later for a last ditch sacrifice.
Top of Turn 2:
It looks like the German infantry line is approaching on an angle. That seems to be in Darryl's favor.
I missed a copy/paste. This is the bottom of turn 2 and the top of turn 3.
The Darryl's, both of them, crowd source the hill with their lights. The German lights lose the missile exchanges, and are both disordered, and flee when charge.
Larry's heavy horse make a right face move towards the main infantry battle line, and are charged by German light horse in the rear. And in a surprise move, Larry's heavies evade.
Meanwhile the Knights continue to follow the von Schlieffen, but the troops being surrounded seem to be getting smaller and smaller.


Meanwhile the Knights continue to follow the von Schlieffen, but the troops being surrounded seem to be getting smaller and smaller. Bottom of turn 3:
Javelinmen threaten German lights.  Longbowmen, their initial delaying action complete, now retire to the field.  Darryl's lights take the hill, while Darryl's heavy foot advance.

Lots of minor adjustments by the Germans.  Follow the arrows.

Darryl feels confident to bring out his heavy foot.  Its flanks will be secured by longbowmen in the fields.

While I play the game with the view from above, the view from 20 degree angle is pretty cool!

Top of the 5th.  And more adjustments.  Dave feels, and I agree, that a general scrum between our heavy foot lines is not his favor.  My attempts to turn their left flank need to be dealt with.  He begins a general retreat.

Not that it matters, but the score is 2-1.

The left field is locked down with Irish LMI.  Their heavy foot continues to advance. 

Another nice angle down view.
Turn 6:
First kill of the day, as kerns are peppered with arrows.  A command of knights links up with half their foot, looking prepared for an assault on the Irish main battleline.

The Galloglaich have found their killing field.  Their taunts can be heard from hundreds of yards away, Their longbowmen are solidly holding the flanks, so any German penetration would be contained.
Top of the 8th.  The Germans begin an aggressive approach.

Another side down view.

 
From the German line emerged a lonely figure.  Advancing under a flag of truce he advances majestically across the field. In the tradition of mixing pantheons and metaphors, it's Montjoy!*  20 paces from the banner of Clan Ramsay, he stops, and in a clear, sonorous voice of an great actor that will only get two lines in this whole show, delivers this message:

To the Anglo-Irish Commander.

The fortune of war is changing have been encircled by strong German armored units. More German armored units have crossed the river Ourthe near Ortheuville, have taken Marche and reached St. Hubert by passing through Hompre-Sibret-Tillet. Libramont is in German hands.

There is only one possibility to save the encircled Irish troops from total annihilation: that is the honorable surrender. In order to think it over a term of two hours will be granted beginning with the presentation of this note.

If this proposal should be rejected one German Knight Corps of six heavy knight units are ready to annihilate the Anglo-Irish troops and their Welsh allies.

The order for charge will be given immediately after this two hours' term.

The German Commander.**

"Nuts"***

So, 5 hours into this game, we called it here.  Dave wasn't coming into the death trap, and I wasn't leaving it.  The final score was 3-2.

Sorry Guys, no major conflicts here.  But we actually enjoyed the maneuvering even if there was no conclusion.

* From Henry V
** General von Luettwitz
*** Brig. Gen. Anthony 'Tony' McAuliffe

Wednesday, October 28, 2020

A Turmoil of Turks

A Headless Body Production
Venue: A Completely Different Undisclosed Basement
Event:
Playing a game for the camera
Players:
Phil running Thematic Byzantine
              
John Doe running Ottoman Turk
Game System:
L'Art de la Guerre, 15mm, 200 points per side.

Friday evening, time to head to the basement for some miniature action.

Same forces as two weeks ago, described in, An Objurgate of Ottomans, But played on a different board with a different set of figures.

I have done over 200 of these battle reports, but this is the first one where none of the figures are mine, and I didn't take the pictures. So I have minimal memory of the game, and the images are not helping much.

So it is just like your perspective, as the reader, then me as the writer.

It was weird just looking at the first picture. I don't even know which side of the board I am on. Turns out I am at the top, when normally I am at the bottom. At least the lists are the same as last week, so I have one frame of reference to draw on.

The Forces:
Ottomans (list 251)
Commanders, 2 Brilliant and one Competent
6 Sipahis, Heavy Cavalry Bow
2 Syrians, Heavy Cavalry Impact
4 Akinji, Light Cavalry Bow
2 Bedouins, Light Cavalry, Impact
4 Janissaries, Medium swordsmen, Bow, Elite
2 Azab Bowmen
1 Light Infantry, Bow
Breakpoint of 21

Thematic Byzantine (list 127)
Commanded by Nikephoros (the younger), Brilliant, Pumaphoros, also Brilliant, and Adidasphoros, the Ordinary, and somewhat Unreliable.
12 Thematic Kataphractoi, Medium Cavalry, Impact and Bow
4 Cursors and Alans, Light Cavalry, Bow
3 Skutatoi, Heavy Spearmen, Missile Support, Mediocre
2 Light Infantry, Bow
2 Light Infantry, Sling
1 Light Infantry, Javelin
Breakpoint of 25 

The Board:
The Ottomans win the initiative and elect to attack in the plains. The terrain is heavy with 3 fields, a plantation and a hill. 

Deployment:
The Ottomans have two identical cavalry commands, each with 4 heavies and 3 lights, led by a brilliant commander deployed heavily on their left. Their Janissary command is not to be seen.

The Byzantine cavalry commands fit perfectly in the 13 UD gap between the fields. LC is positioned for screening, LI in the fields.
The view from the Ottoman left
Some forgotten troops missed their wake up and were late arriving. I'm just labeling the new figures as I had already annotated the deployment photo above, and did want to do it again.

Turn 1:

The Byzantines decline the delay of game penalty. The Ottomans move out.
Pretty much just a straight line. Light Horse running around the Byzantine right flank.


The Byzantines move out, but hold to the fields edge and keep their distance from the Turk foot bow. As Medium Cavalry (ordinary) they are pretty vulnerable to bowfire.

Off of the right edge of the picture, Alan Light Cavalry race up the edge. If they can get by the Jannisaries, the Turkish camp is vulnerable.

The view from the Byzantine side of the board.


Turn 2:

Ambushes are all revealed. Foot bow loose arrows, and the Byzantine horses begin to fall.

Turk light horse find Psiloi in the fields. Their heavy horse take a position to flank Byzantine cavalry should they decide to charge out.

The Byzantines have the advantage with missiles, as all of the Kataphractoi have them, while the Turks have only 6 heavy cavalry that is bow armed. But the Byzantines also all have lances, while the Turks have just two. 

But the Turks have 6 foot bow units, and they can ruin the day of medium cavalry.

Once in range, the Byzantine cavalry have only one choice, and that is to charge, even though it is up hill. They could have withdrawn, but that would just give the Janissaries a chance to run them down, shooting them in the back.

Fortune favored the fools. The Janissaries have two units run down, including their commander.

The view from the Byzantine left. Half of their cavalry is disordered, but the position on the hill is secured.

Turn 3:

The last Janissary on the is not going down without a fight, and destroys a Thematic Troop.

Ignore the red XX on the hill, that is an error. 

The Turks are being patient. Their Azab foot archers are safe in the field, they just need to clear the Psiloi from the field, and turn the Byzantine flank.


Ignore the dice, the score is 10 out of 21 for the Turks and 6 out of 25 for the Byzantines


The Byzantines commit.

Charges down the line. In the open area, Turks resist the charges, tieing 2, winning 1, and lose the fourth. 

So the Byzantines have penetrated the Turkish line, but their forces are now fighting just mounted on mounted where the Turks have the armor advantage.

A Janissary is killed on the hill in a similar manner, while the last one is taken in the flank and rear.


In the field on the Byzantine right, Psiloi charge Turk Heavy Cavalry, then a Thematic Cavalry flanks the unit as well. 


Casualties climb rapidly. 17 to 13 in favor of the Byzantines.

It was at this time Dave realize that he was not counting the dead correctly, and was much closer (1) to demoralization then he thought.

Turn 5:

In the field, a desultory charge by Bedouins into the Psiloi flank. But to no effect. But the Byzantine Thematic Cavalry in the field is ridden down by a Sipahis flank charge.


An Azab is destroyed in the field, another picked up a missile hit. The last Janissary is destroyed. Taking the Turks over their demoralization points for a Byzantine win.
The view from the hill.

So what was different from this fight from the last game, An Objurgate of Ottomans, where the Ottomans thoroughly trashed the Byzantines?

In short, the terrain, and how it was played.

Last game:

The Byzantine Front has a field on their left
While on their right the Ottomans have a Coastal, a village and a field on their left.
Today's game also has the Byzantine flanks covered by a field, and the Ottomans have a hill and and field on their right flank.

It looks pretty similar, but there are some differences that were crucial.

First, the force projection of the Janissaries. In the first game, they were in a field, some 9-13 UD's from the edge, with bowfire range, they were projecting up to 17 UD's from the edge, almost to the center of the board.

In this game, they were on the Hill, some 8-9 UD's in, and could project 13 UD's with bowfire. The Field next to them had a pair of Azabs, also bowmen, which project to the center of the board if need be. 

But a gentle hill is not a field bordered by a village, which is Difficult terrain. And while the hill still provides a +1 in combat with a height advantage, it is not like a field, where Cavalry are -2 and lose impact. In short, the Janissaries were immune to cavalry in the first game, while they were merely a difficult problem in this game. And a couple of favorable die rolls were all that was required to take them out.