Wednesday, March 30, 2016

Spanish Salsa and Swiss Wine

A Headless Body Production
 
Location: Lancaster Host Convention Center
Event:      Cold Wars 2106
Venue:     L'Art de la Guerre Medieval Theme, Round 3.
Players:   Phil Gardocki, Swiss, list 220, year 1400.
                 Roger Taylor, Medieval Spanish
Game:      L'Art de la Guerre, 200 points
Description: A battle report between Early Swiss and Medieval Spanish.


The Spanish won the initiative roll and decided to attack, so the Swiss get to pick the terrain.  


The terrain could not be more favorable for the Swiss.  Steep hills and an impassable lake for the Spanish to squeeze around.
The Spanish left flank is compressed 3 ranks deep to pass through.  Lets see if I can peel them off.

I have an advantage in command points, so I'll spend a few to annoy one of his commands.
Turn 2:

The Swiss Light Horse race for the flanks.  I know his Heavy Infantry won't try to force the hill, but I want to let him think I'll stay on it.
The Light infantry have done all they can, which was nothing.  The Spanish Knights are ready to charge.

The Swiss will have a few more Halberdiers to fill this gap soon.

Knights have a huge advantage here.  +1 vs foot, +1 for Impact, and half of them are Elites.  In an effort to throw off the massive coordinated attack the Spanish have planned, the entire Swiss Main battle, turns and marches away.   The Spanish counter the Swiss Light Horse by sending a couple of their own Light Horse to their right flank.

Having extra command pips, the Swiss send the Light Infantry on an side adventure.
Turn 3:

The Swiss Light Crossbow have done their job.  Capturing the attention of an entire battle!

The Spanish line holds position.  Except for their Light Cavalry, which chased off the Swiss LC Crossbow.

The Swiss turn back around and advance.  Making contact on the right, coming off the hill on the left.  The LC Crossbow even causes a missile hit on the Spanish LC.
Turn 4:
The Swiss fail in their objective to break up the Spanish lines.  Even with their advantages against infantry they lost a Halberdier unit on the right flank. On the left the Spanish Infantry holds its own.  But in the center, the massive knight charge slams home, scattering man and weapon to the winds.
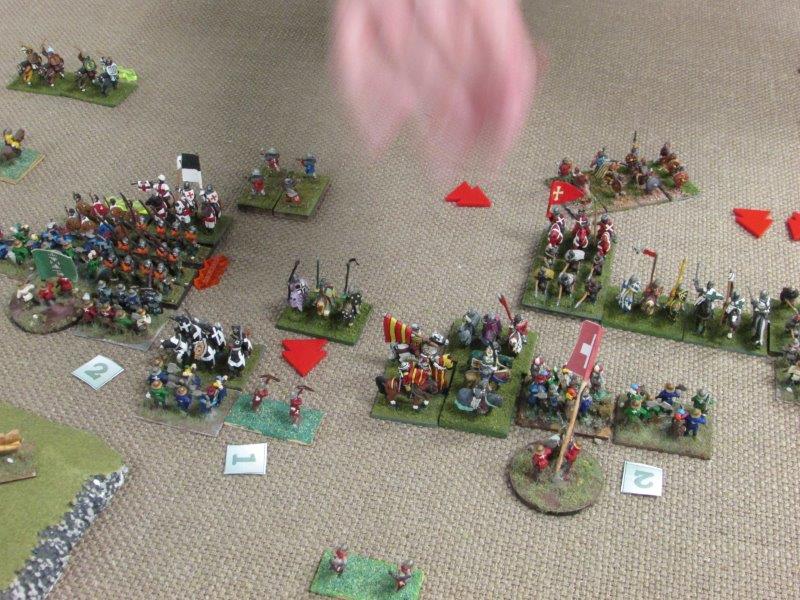
6 Knights charge in, and the Swiss roll 6 2's in response.  The red "people pizza's" mark the dead, while the number 2 cohesion markers mark the soon to be dead.


On the left, the Spanish LC retreat, hopefully to rally.  Some of the Spanish Infantry is damaged in the only bright spot in this disaster.

A close up on the center.  Revealing that what looks like a bad situation is actually worse, as the knights have penetrated the lines and will son be flanking the survivors.

There are some spots where the plan is working.  The Swiss have flanked the Spanish right most battle.

On the left, a fresh Halberdier is thrown into the fight.

On the far right, two Light Infantry Crossbow units continue to annoy and confound.
Turn 5:
It was really over on turn 4.  The Swiss center, and largest battle, was almost totally destroyed.  It is just a matter of points at this time.

The Spanish victory is so great, that there are not enough Halberdiers to go around.


The Swiss List:
Brilliant General:  Larry
Brilliant General:  Darryl
Competent General:  Darryl
14 Medium Swordsmen 2HW Elite
1 Medium Swordsmen 2HW
4 Light Infantry Crossbow
2 Light Cavalry Crossbow
3 Fortifications

The Spanish List:
Not recorded

So what went wrong?  My deployment was almost perfect.  The steep hills prevented any flanking maneuvers, my lines fit well in the gaps.  I had reserve units to counter any problems.  Two LI units managed to draw off 6 units.  Possibly this is just a bad match up, as the knights were +2 on impact against the Halberdier's +0.  Both sides were elites so there was no advantage there.  

On the flanks against the infantry, I had the the advantage, but still lost on the right, and didn't do well enough on the left.  Bad match up's are going to happen.  I think it is time to switch to a different army. 

Thursday, March 24, 2016

A Surfeit of Arrows.

A Headless Body Production

Round one of the Medieval  L'Art de la Guerre 15mm tourney.  I have high hopes as my Swiss list was currently undefeated in the previous games played last month.

Location: Lancaster Host Convention Center
Event:      Cold Wars 2106
Venue:     L'Art de la Guerre Medieval Theme
Players:   Phil Gardocki, Swiss, list 220, year 1400.
                 Mike Kennedy, 100 Years War English
Game:      L'Art de la Guerre, 200 points
Description: A battle report between Early Swiss and 100 Years War English

The English won the toss and decided to attack, so the Swiss get to pick the terrain. 


The English have a very nice looking camp.  My camp is also made of toothpicks, but looks nowhere near as nice.
The English left flank.  One light cavalry unit and 3 ambushes.
The English center.  From left to right heavy spear, longbow, crossbow, longbow, and 2 medium spears.

From left to right, crossbow, longbow, heavy spear, heavy sword, 4 foot knights, and a heavy sword.
The long view.  The Swiss main body is between a steep hill and a wood.
The right flank long view.
Turn 1:
I decide to let him come to me.  The English double move their main battle till it stops 4 UD's from the Swiss skirmish line.  Only after my turn, did I realize that in the upcoming turns, the Longbow were going to be able to get at least 3 rounds of shooting at me before I can engage them.  That does not sound like a good idea to me.
The English line advances, the Swiss line holds.

Light Cavalry Crossbow move out to meet Light Cavalry Javelin. 

Turn 2:


The English line advances, right up to the edge of the Swiss crossbow skirmishers.

The Longbow reach out and touch a Halberdier unit.
The light cavalry draw some attention.

The Swiss rally one hit off of a Halberdier, but pick up two more cohesion hits.

Turn 3:
I am about to learn a lesson on skirmisher management here.  In most games, skirmishers are immune to a line of close order foot.  They always can run away, and run faster.  In L'Art de la Guerre a solid line of foot have a trick up their sleeve.  This is how it works:

First, the two units along the sides of the lights move forward and slide directly behind them.  Then the units in front of the lights move forward.  The lights have no where to retreat and are killed.

Before someone comments that this is a slimy maneuver, look at it this way, the lights out ran their supports, and were captured and killed.  If they were a little bit closer to their friendly battle line, this would not have happened as enemy units are not permitted to "slide" when in an opposing zone of control, which extends 40 mm in front of a unit.  So the lights would live if they were closer than 70mm to their friends.

Also, the disadvantage of this maneuver is that 2 units of foot knights are now in the second rank.

In their turn, the Swiss charge.  Destroying a longbow unit on contact, and taking advantage of overlaps on an enemy sword unit.  But other than the longbow unit, the rest of the fight went in favor of the English, as casualties mount.

The Swiss axemen, in blue tunics and red hats, having destroyed their opponents, exploit their hole in the enemy lines.
Turn 4:
The main battle did not go well for the Swiss.  Two units destroyed to only a pair of cohesion hits.


Then third halberdier was lost to a longbow unit.

On the right flank, the smaller Swiss command, raced out of the woods, crashing into another battle of 2 longbow and a crossbow.  Another longbow unit dies, a second takes hits.

But this was the last hurrah for the Swiss.  The English center, which is composed of elite foot knights with 2 handed swords were just better than the their Swiss counterparts.  Both were elites, but the foot knights could take 4 hits to the halberdiers 3, and the knights armor negated the Swiss 2 handed sword advantage.  The center of the Swiss battle just dissolved, giving the English 20 points to 14 in the end.

Lessons learned.  
I  have to use the skirmishers better.  As skirmishers go, the Swiss suck.  And that is not going to improve.  My original thoughts were that they could cause one cohesion hit a turn, and that was enough for the halberdiers to take advantage of.  But I don't think that is the case.  I think my skirmishers need to just try to survive, and not give my opponents 6 points towards the army break point.

This is a tournament, I am not going to see weak, or fun armies.  The advantage of the Swiss is that they are all elite.  But that advantage goes away, if all my opponents are elite as well.


The Swiss List:
Brilliant General:  Larry
Brilliant General:  Darryl
Competent General:  Darryl
14 Medium Swordsmen 2HW Elite
1 Medium Swordsmen 2HW
4 Light Infantry Crossbow
2 Light Cavalry Crossbow
3 Fortifications


If you want to see the HYW list, it is below.


Thursday, March 3, 2016

The Dublin Zurich Affair

 A Headless Body Production


Location:  Regency at Providence Community Center, Phoenixville, Pa
Event:       Providence Gamer's Game Knight
Players:    John Seydow, playing the Swiss circa 1400AD.
                  Bruce Potter, playing Anglo Irish
Game System: L'Art de la Guerre, 100(ish) points per side.
Scenario:  A demo game for two people that are new to Ancients. 
TechnologyA new camera!  With a tripod!  The old camera (Canon SX110) wasn't bad, but the new one (Canon SX400) has 4 times the light gathering capability, and a better zoom.
 
The Forces:
For 100 point games, the board is smaller, and the number of terrain pieces limited to two per playerLarry, the Swiss General, was Brilliant.  Their forces consisted of 9 Halberdiers (Medium 2 Handed Swordsmen), 4 Light Infantry Crossbow, 1 Light Horse Crossbow and a fortified camp.  
     
Darryl, the Anglo Irish commander, was also Brilliant.  He brought a wide array of forces, including a Medium Knight, 2 Heavy Cavalry units, 3 Longbow, 3 Galloglaich (Gaelic for "Grey Foreigners") , 2 units of Irish Foot, 2 units of Kerns and a fortified camp. 

Deployment:
The Swiss win the toss and elect to receive!  They select 2 steep hills.  The Irish selected a wood and a brush.  Three of the terrain pieces fell on the Swiss Left flank, but one piece was not playable and discarded.  The remaining steep hill was in the center of the Irish line.

The Swiss deploy their Halberdiers in a long line in the center, supported by a single LI Crossbowman, their left flank held by a single LI Crossbowman in the woods.  Their right flank, had a single Halberdier to catch any flank runs, supported by 2 LI Crossbow and a Light Horse Crossbow.

The Anglo-Irish infantry is set up to shoot then pull out the Longbow, taking advantage of the interpenetration abilities of swordsmen through bow.

The Swiss line, liberally dosed by crib notes. 
The Anglo-Irish right-center deployment.  Irish Foot end capping 3 units of longbow.  Backed by Galloglaich.

The Anglo-Irish center-left line.  The Camp, incorrectly placed on the hill, is defended by 3 small boys and their dog and is flanked by Heavy Cavalry and Knights.
Turn 1:
Darryl  rolls a 6, with 4 command points, double times his infantry towards the Swiss line.  However he holds back is horse.  His thought was to keep the impetuous cavalry under control, until the main battle lines are engaged.
Spending extra command points, the Irish foot quick march.

But the horse stay behind.

Shouting "Viva il papa", the Swiss advance in two battles, one with Light Infantry cover, the other bearing down on the Irish left.

The longbow start their work damaging the Swiss LI and one of the Halberdiers.

Turn 2:
The Swiss Light Horse, had approached to within charge reach of the Irish Horse, triggering a pair of impetuous charges.  The main Irish battle line is satisfied with the range and continue to rain arrows onto the Swiss line.

The lines at the beginning of turn 2.

Yes, both of the impetuous Heavy Cavalry are in range.  The cost to hold them back is 3 command points. 

Charge and flee.

The Longbow shoot quite well, stripping the Swiss screen and further damaging a Halberdier. 

The Swiss respond.  They leave their damaged unit behind.  Charging the Irish Javelin-men, causing two points of damage.
The longbow, at a range of about 5 meters fire their last volley, but to no effect.  The Swiss manage to Rally their damaged Halberdier, raising it's cohesion level to 1.

Turn 3:
Summation so far. The Irish have 3 points (1 killed, 1 damaged unit) against 2 points (2 damaged units)

The main battle lines are either in contact, or will be this turn.  Both sides have a heavily damaged unit, 2 out of 3 points.  Two Irish Horse units are chasing skirmishers. 

As one, the Galloglaich charge, replacing the longbow.  It is elite two handed swords vs elite two handed swords!
The Galloglaich interpenetrate the longbowmen.  This is an utterly fair fight as the troop types is both elite swordsmen 2 handed weapons.  The Swiss gain the advantage, causing cohesion hits on two of the Galloglaich, and also destroying the Irish Javelin-men.  Their only damage to the front line was from missile fire from the other Irish foot.

The Swiss have turned the left flank on the Irish and charge.  They also are wrapping up the Irish right flank.
Turn 4:
The score is Irish 3, Swiss 4.
The Irish lose a Galloglaich unit, but the Swiss have invited a charge by knights in their rear.  The remaining Galloglaich fight well, damaging most of the Swiss line.
In what is mostly an anecdotal event, the Irish Heavy Cavalry are mainly chasing smoke.
Well, this is totally confusing.  There are almost no units undamaged on the board.  The Galloglaich fought bravely, but futilely, their routs causing damage to the longbow behind them.  The last Irish hope of the Knight charge, started well, but now the knights themselves are flanked. 
Overview of the main battlefield.  One Irish Horse is still chasing skirmishers, but the other has found something else to fight.
The final fight.  Irish Javelin-men are facing a unit of Halberdiers, and roll very poorly.
And take 3 hits, damaging two units with their rout.


With the rout of the second Irish Foot unit, the Anglo-Irish hit their army break point of 14, the Swiss were sitting at 6 points.  A fairly convincing Swiss win.

The Anglo Irish is my favorite army using the Warrior Rules set.  I don't now how effective the longbow are in LADG, they should be pretty good, as most units have a protection factor of zero against them.  I am not sure the thing to do with the Galloglaich is to replace the bow before combat.  This allowed the Swiss to wrap both flanks of the Irish while the Longbow took no part in turns 3 and 4.

But would it have mattered?  The Swiss had 9 elite hand-hand combat units in this game, vice 4 elite and 4 ordinary hand-hand units.  I'll just have to play more games!